Friday, September 29, 2017

Delicata Squash – They’re Not Just for Decorating Anymore

I always look forward to seeing delicata squash appear in the Fall, but with that comes a certain amount of frustration, since I’m pretty sure there are plenty of shoppers who walk right past it, thinking it’s some sort of decorative gourd. They do look like those ornamental cornucopia fillers, which is why I’ve been tempted to walk up to people at the market, who I’ve seen look at these, but not put in their basket, and tell them what a big mistake they’re making. Of course I haven't, since that’s just not done.

The point is, not only would these dress up any holiday table, but they're also absolutely delicious, uniquely textured, and easy to prepare; as long as you don’t cut off a finger. Much like our friend the butternut squash, these are very hard, and you have to be extremely careful when cutting. I think the technique shown herein is a pretty safe way to go, since your fingers are well away from the blade.

Once prepped, season to your liking, with salt and oil being the only mandatory ingredients, and then roast in a hot oven, until tender, and as caramelized as you like. I usually don’t flip halfway through, since I’d rather have one really crusty side, than two sort of crusty sides. Once baked, these can be served hot as a side dish, room temperature as a snack, or cold in a salad. Regardless of how you enjoy them, I hope you give these roasted delicata squash a try soon. Enjoy!


Ingredients for 2 portions:
1 large delicata squash
1 tablespoon olive oil
1 teaspoon salt
cayenne pepper to taste
- Roast at 450 F., for about 12 to 18 minutes, depending on how thick your slices are.
-- My “Pumpkin Spice Aioli” was mayonnaise, seasoned with garam masala, turmeric, and hot paprika to taste.

Wednesday, September 27, 2017

Cider Braised Pork Shoulder – And by “Braised,” We Probably Mean Stewed

If you watched our recent spaetzle video, you saw me serve up a nice hunk of cider braised pork shoulder, during which I wondered out loud if we’d done that video yet. Turns out that we hadn’t, so as promised, here you go.

As the title may indicate, this isn’t technically a braised dish, since the meat is pretty much covered with cooking liquid, but whenever I have to choose between alliteration, and accuracy, I predominantly pick the former.

I kept things very simple here, so feel free to add extras like carrots, potatoes, Brussels sprouts, and other fall veggies, if you like. There’s really no way to screw up a dish like this. Unless, of course, you stop cooking it before it’s done. I’ll never understand recipe reviewers complaining that the meat in a dish like this, never got tender.

Tough meat always gets tender, if you cook it long enough. Always. The problem is, people go by the times given, which may or may not be long enough. No matter what a recipe says, always continue cooking until it’s fork tender, and can be easily broken apart.  So, with that in mind, whether you’re topping spaetzle or not, I really do hope you give this a try soon. Enjoy!


Ingredients for four portions:
3 to 3 1/2 pound boneless pork shoulder, cut in 3 to 4-inch chunks
Enough Kosher salt to season pork generously
1 tablespoon vegetable oil or rendered pork fat
1 large onion, chopped
1 teaspoon salt, plus more to taste
1/2 teaspoon freshly ground black pepper
1/4 cup freshly torn sage leaves
1 bottle (750 mil) hard cider, or regular cider, or apple juice
1/3 cup apple cider vinegar
1/2 cup crème fraiche, or heavy cream
pinch cayenne
crème fraiche and chives to garnish

Tuesday, September 26, 2017

Today’s Video Delayed Due to Wisdom

Tooth, that is. I have a cracked wisdom tooth that needs some attention, and so I’m not exactly sure when I’ll be able to finish the voice over for today’s recipe. I ended up filming the cider-braised pork you may have seen in the spaetzle video, and look forward to posting it soon. Stay tuned!

.

Friday, September 22, 2017

How to Make Spätzle (aka Spaetzle) – Little Sparrows for Big Meat

Apparently “Spätzle” translates to “little sparrows” in German, which makes a lot of sense when you consider their shape. What doesn’t make sense is why these micro-dumplings are also called “spaetzle.” Is it an alternate spelling? A different recipe? I’m hoping maybe some of our German foodwishers can clear this up.

Since my favorite German restaurant calls this stuff spätzle, that’s what I went with, and they are as easy to make, as they are hard to correctly pronounce. You only need a few ingredients, all of which you generally have on hand at all times, and they take just minutes to cook.

Once boiled, you can toss in butter like I did, or sauce them any way you’d sauce similarly shaped pasta. While wonderful served as-is, they make the perfect side dish to any large hunk of slowly braised meat. I paired mine with a pork shoulder stewed in hard cider, and it was amazing.

I thought I’d posted a video for that, but it was actually a cider-braised pork cheeks recipe I was thinking of, which would work perfectly here. So, I may have to do a braised pork shoulder after all. In the meantime, I’m sure you’ll have little trouble figuring out what to serve yours with, and I really do hope you give this Spätzle recipe a try soon. Enjoy!


Makes 2 portions:
1/2 cup all-purpose flour, plus more to adjust
1 large egg
1/2 teaspoon kosher salt
pinch of cayenne
1 tablespoon cream fraiche, sour cream, or yogurt
3 tablespoons milk

Tuesday, September 19, 2017

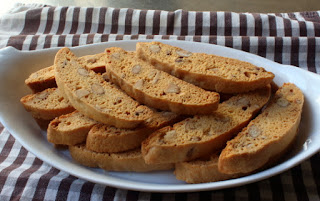
Almond Biscotti – Because Winter is Coming

This biscotti video is another installment in our long-running series, “Recipes I Can’t Believe I Haven’t Posted Yet.” But, while I took my sweet time recording this classic Italian dipping cookie, at least I picked a good time to finally feature it, since winter is coming, and with it, plenty of cookie-appropriate occasions.

I decided to go with a very straightforward version, since that’s my personal favorite, but that doesn’t mean you can’t jazz these up in any number of ways.  Different nuts, like hazelnut and/or pistachio work beautifully in these, as does any type of dried fruit. And of course, dipping these in dark chocolate is never a bad idea.

By the way, don’t let that cup of sugar fool you. These are not particularly sweet cookies, and there’s a good reason for that. Traditionally, these are served to dip into sweet dessert wines, like Vin Santo, which is why we don’t want them too sugary to begin with. That’s also the reason why we really do want these crunchy all the way through.

I was pretty noncommittal with the cooking time once these are sliced and put back in the oven, since depending on the size and shape, your baking times will vary greatly. The best plan is to keep peaking at them once they get close, and wait for that perfect golden brown. So, with my apologies for bringing up the holidays so early, I’ll finish by saying I really do hope you give these almond biscotti a try soon. Enjoy!


Ingredients for about 28-30 cookies:
2 cups all-purpose flour
1 teaspoon baking powder
1/4 teaspoon fine salt (1/2 teaspoon kosher)
3 tablespoons room temperature unsalted butter
1 cup plus 1 tablespoon white granulated sugar
1 tablespoon olive oil
2 large eggs
1/4 teaspoon vanilla extract
3/4 teaspoon almond extract
1/2 cup roasted whole almonds
1/2 cup roasted chopped almonds
- Bake loaves at 350 F., let cool 15 minutes before slicing, and then finish at 325 F. until golden brown, and crunchy

Friday, September 15, 2017

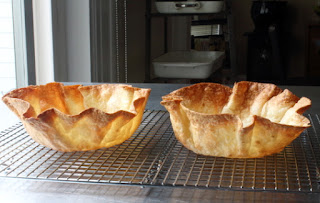
Crispy Basket Burritos – For Once, Oven-Baked is Better Than Fried

I worked at a Mexican restaurant while in college, and one of my least favorite tasks was frying the flour tortilla bowls. You had to hold the two parts of the basket that formed them together while they fried, all the while getting splattered by hot fat, and breathing grease vapors. It wasn’t fun, but they did come out nice and crispy, so to everyone else involved, it was totally worth it.

Here, we’re using the oven to achieve what I consider a superior product. They’re just as beautiful, and crispy as the ones from the deep fryer, but seem to be much less greasy. Not to mention, the mess is significantly less. I’ll trade those things for a few extra minutes production time any day.

Just be careful not to burn them trying to get the inside bottom crispy. Since that area is protected from the sides, it’s not going to get as browned, but it doesn’t have to. As soon as this is filled, no one will know the difference. Speaking of filling, deciding that is probably the hardest part of this whole operation, but I’m confident you’ll come up with something worthy. I really hope you give these a try soon. Enjoy!


Ingredients for 2 Crispy Basket Burrito Shells (aka Tortilla Bowls, or Tostada Shells):
2 flour tortillas (about 8 inches in diameter)
1 tablespoon vegetable oil
oven safe ramekin, about 4 inches in diameter

Tuesday, September 12, 2017

Chicken Tinga – Torn Between Two Lovers

Whenever I’m ordering something with chicken at a taqueria, I’m always presented with the same three choices. The grilled chicken, the green chicken, which is cooked in a tomatillo sauce, and the red chicken, also know as chicken tinga.

I usually forgo the grilled option, since whatever I’m ordering almost always benefits from sauce; which leaves me with the nearly impossible decision of choosing between the red and the green. I love both, so I’m always torn. By the way, in Mexican culinary lingo, tinga means, “torn.”

Anyway, now that the title makes sense, I can finish this post up by reiterating how great this came out. There are faster methods to make this, but taking the extra time to reduce the cooking liquid, as well as possibly the sauce, really pays off in the end.

The real challenge here is deciding how to use it. You can’t go wrong with tacos, but my favorite delivery system is tostados. Fry up a corn or flour tortilla nice and crisp; top with tinga, and garnish with the usual suspects. It doesn’t get any better than that…unless the tortilla is shaped into a bowl, which I’ll show you how to do quickly, and mess-free, in the next video. Until then, I really hope you give this a try soon. Enjoy!


Ingredients for 6 large portions:
3 pounds boneless skinless chicken thighs
3 cloves peeled whole garlic cloves
1 large yellow onion, halved
1/2 teaspoon dried oregano
2 teaspoons kosher salt, plus more to taste
4 cups chicken broth
1 cup water
1 can (7-oz) chipotle peppers in adobo sauce
1 can (28-oz) peeled plum tomatoes (I recommend using San Marzano) or 3 1/2 cups of any fresh or canned tomato product
2 tablespoons olive oil or reserved chicken fat
1 large onion, diced
Cotija cheese and cilantro to garnish

Friday, September 8, 2017

Chorizo Fundido, Completo

If too much sausage in a cheese dip was the biggest problem you have during a workweek, you have to consider that to be a pretty great week. They say, less is more, but I was hoping that twice the amount of chorizo in this fundido would make it twice as good, but that wasn’t really the case.

The taste was great, and as I said in the video, I highly doubt anyone at your party would complain, but what I really wanted was an ooey, gooey, much drippier dip, and so in this case, less would have been more.

Below, I’ve listed the amounts as I think they should be, with what I actually used in parentheses, and I’ll leave it up to you, to adjust as you see fit. Besides the sausage amount, I think adding some sour cream may also help the cause. Are you ready for some football? I am, but even if you’re not going to serve this chorizo fundido to a bunch of screaming lunatics on game day, I still hope you give it a try soon. Enjoy!


Ingredients for 8 portions Chorizo Fundido:
8 ounces fresh pork chorizo (I used 1 pound)
1/2 cup sliced green onions, the light parts
1 red bell pepper, diced
2 poblano chilies, diced
2 jalapenos, diced
4 ounces cream cheese (I used 8 oz)
4 ounces sharp cheddar
8 ounces Monterey Jack cheese
1/4 cup sour cream (I think it may help give a creamier texture)

Tuesday, September 5, 2017

Sea Bass San Sebastian – Haven’t Been There, Done That

You do not have to go to a place, to be inspired by their food. In fact, it’s a lot cheaper, and easier if you don’t. So, as I stated in the into, this Chilean sea bass San Sebastian is the result of a little culinary mind game I play, where I try to invent a recipe that I think could/would be served there, and this is one of those dishes.

I love the technique of spreading a flavored mayo, or aioli over a piece of fish, before roasting it in a very hot oven. Not only does it keep the seafood moist, we don’t have to worry about making a sauce when it’s done. Another advantage is that by simply changing the seasoning of the sauce, we can create countless variations.

This will work with any piece of fish you can cut into a thick chunk, but Chilean sea bass is my favorite choice. By the way, that’s just the name it’s commonly sold by. Its real name is the much less marketable “Patagonian toothfish.” Mmm….toothfish. Due to past overfishing, much of it illegal, Chilean sea bass has landed on lots of “do not eat this” lists, but there are sustainable sources available.

I got mine from Markfoods.com, which is certified by the Marine Stewardship Council (MSC), and the quality was top notch. This is not a sponsored post, but in the spirit of full disclose, the fish seen herein was a complimentary sample sent to me by my friend Kevin, who runs the operation. Regardless, this was one of the best fish dishes I’ve had in a while, and I really hope you give it a try soon. Enjoy!


Ingredients for 2 servings:
1 pound Chilean sea bass filet, cut into two portions
kosher salt to generously season fish
For the sauce/crust:
3 tablespoons mayonnaise
2 teaspoons sherry vinegar
1 teaspoon smoked paprika
1 teaspoon kosher salt
2 garlic cloves, crushed fine
cayenne to taste
whole roasted Marcona almonds for grating, or any other whole almond
2 teaspoons olive oil
1 hot or sweet red or green pepper, sliced
handful halved sun gold cherry tomatoes

Saturday, September 2, 2017

Sourdough Bread: Part 2 – The Finished Loaf

Welcome to part two in this series for how to make your own sourdough bread, using nothing more than flour, water, a little salt, and a whole lot of time. 

Yes, making your own sourdough does take a while, but the amount of actual work is minimal, and the bread you’ll get is spectacular…at least in San Francisco. Your results may vary.

While I’ve made sourdough before, I’ve never actually had to provide specific measurements, which is why I’ll credit Northwest Sourdough once again, since the amounts below were slightly adapted from there. Speaking of which, anything you’re not sure about after watching this, can be cleared up by visiting Teresa’s amazing channel.

If you don’t have a banneton, you can simply line a similarly sized bowl with a tightly woven cotton kitchen towel, which has been generously coated with rice flour. I’ve used that before, and it works exactly the same. The only difference is the wooden basket “breathes,” unlike a metal bowl, but I don’t think that’s a huge deal.

Since the wild yeast and bacteria that make this bread work vary from one part of the country/world to another, I can’t guarantee you’ll get the same results I did, but nevertheless, I really do think you should try anyway. In fact, if you do have some success, I’d love to see the results posted on Twitter for all to see.  Good luck, and as always, enjoy!


Ingredients for one loaf:
100 grams starter
250 grams water
8 grams kosher salt
394 grams white bread flour
(You’ll also need rice flour for the 10-inch banneton)

- Let ferment for 4 hours, “folding” at the 2 hour mark
- Form loaf and transfer into prepped banneton
- “Retard” dough in fridge for 10-12 hours
- Let rise in warm spot for 3 to 5 hours or until it passes “poke test”
- Bake at 450 F. for 25 to 30 minutes