And, as always, enjoy! If you want more information about why the blog format has changed, and why we're now offering complete written recipes, please read all about that here.
Frozen, ready-to-use phyllo dough is a wonderful cheater ingredient, which can be used to produce an array of gorgeous pastries that look like you put way more effort into making them than you really did. Just brush some butter between the impossibly thin sheets, wrap up whatever you’re wrapping up, and bake until crispy and golden-brown. My only complaint with this operation is...to read the rest of Chef John's article about Baked Feta Phyllo with Honeyplease follow this link to become a member.) Follow this link to get a complete, printable written recipe for Baked Feta Phyllo with Honey!
And, as always, enjoy! If you want more information about why the blog format has changed, and why we're now offering complete written recipes, please read all about that here.
And, as always, enjoy! If you want more information about why the blog format has changed, and why we're now offering complete written recipes, please read all about that here.
And, as always, enjoy! If you want more information about why the blog format has changed, and why we're now offering complete written recipes, please read all about that here.
And, as always, enjoy! If you want more information about why the blog format has changed, and why we're now offering complete written recipes, please read all about that here.
And, as always, enjoy! If you want more information about why the blog format has changed, and why we're now offering complete written recipes, please read all about that here.
I love a great dip, and potatoes might be my favorite food, so it’s not surprising that I’m a huge fan of Skordalia. This Greek garlic dip and spread is so simple to make, and so satisfying to eat, it’s sort of surprising it hasn’t achieved a similar popularity as its distant cousin... to read the rest of Chef John's article about this Skordalia recipe,please follow this link to become a member.)
And, as always, enjoy! If you want more information about why the blog format has changed, and why we're now offering complete written recipes, please read all about that here.
Who Bob was, or how I knew him, or whether he even really existed isn’t the point here. What matters is how amazing this “kofta” style kabob, or kebab if you prefer, really is. These use ground meat instead of the more common cubes, which not only looks super cool on the skewers, but also allows us to ... to read the rest of Chef John's article about this Bob’s Kabobs,please follow this link to become a member.) Follow this link to get a complete, printable written recipe for Bob’s Kabobs!
And, as always, enjoy! If you want more information about why the blog format has changed, and why we're now offering complete written recipes, please read all about that here.
It’s always treacherous attempting an iconic, regional specialty like Cincinnati-style chili, especially when you’ve never actually had the “real thing.” People tend to be very protective of these types of dishes, and any variance from what they think the recipe should be like is generally met with a visceral condemnation. Knowing this going in, I made sure to ... to read the rest of Chef John's article about Cincinnati-Style Chili,please follow this link to become a member.)
And, as always, enjoy! If you want more information about why the blog format has changed, and why we're now offering complete written recipes, please read all about that here.
When you get to a certain age, you think you’ve seen and
done it all. Whether we’re talking professionally, romantically, or culinarily,
by your mid-fifties, any real surprises are few, and far between, and this is particularly
true when it comes to egg recipes. What can you possibly do with eggs that you
haven’t already done many times over? Well, these Turkish eggs, that’s what.
If you want more information about why the blog format has changed, and why we're now offering complete written recipes, please read all about that here.
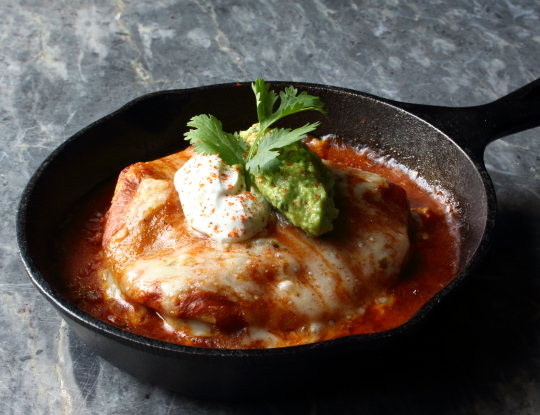
I’ve wanted to do a homemade red enchilada sauce video for a
while now, and not just one. Eventually, I need to film a proper Mexican-style
enchilada sauce, but first, may I present the faster, easier, but still very delicious,
Tex-Mex version. Speaking of faster, I thought by stacking these, they’d be a little
quicker to make, but they took the same time as rolled ones. That means they’re
both fast and easy.
Since we are taking the shortcut of using dried chili
powder, be sure to at least get a nice one. I used ground Ancho, which is very
nice, but what isn’t nice is that old bottle of chili powder you’ve had in the
pantry since the 90’s. If you live in some remote location, go on the Internet
and order something fresh. Besides using it in this, your next pot of chili will also be grateful.
If you’re making the sauce ahead of time, it’s a good idea
to heat it up first before assembling your enchiladas, so they are warm going
in the oven. Otherwise, you’ll need to give them some extra time in the oven,
so they get completely heated through. I love chicken enchiladas more than
someone probably should, but this same preparation done with shredded, stewed
beef, is not to be missed. Either way, I really do hope you give these a try
soon. Enjoy!
Ingredients for 2 1/2 cup Red Enchilada Sauce:
(enough for 4 to 6 Portions)
2 tablespoons olive oil
2 tablespoons butter
1/2 cup diced onion
1/2 teaspoon salt, plus more to taste
3 to 4 tablespoons all-purpose flour, depending on how thick
you like it
2 tablespoons ground chili powder, like ancho
2 teaspoons ground cumin
1/2 teaspoon chipotle
1/2 teaspoon freshly ground black pepper
1/4 teaspoon dried oregano
cayenne to taste
small pinch cinnamon
3 cloves minced garlic
2 tablespoons tomato paste
2 1/2 cups chicken broth
Fillings for each enchilada:
3 small corn tortillas
2/3 cup shredded cooked chicken
2/3 cup shredded pepper or regular Monterey Jack cheese, plus
more as needed
One of my all-time favorite things to do is take an iconic
recipe, and somehow tweak it to maybe make it easier, healthier, or tastier;
which was definitely not what happened here. This was simply a case of
me wanting hummus, not having garbanzo beans, and making it anyway with sweet
potatoes, which, much to my amazement, came out remarkably well.
I don’t blame you if you're skeptical, but this stuff really does
have almost the same taste and texture as hummus. It has a little bit of a
sweeter finish, which reminded me of a red pepper hummus, but all in all, it’s very close. In fact, my wife Michele, who has a much more discerning
palate than I do, said that if she were blindfolded, she’d have trouble
identifying this as not being actual hummus.
However, to get this close to what you think hummus tastes
like, please be prepared to adjust the ingredient amounts to your liking.
Some folks like just a hint of garlic and lemon, while others like to be
crushed by it. Same goes for the tahini, and other seasonings, so taste, and
adjust accordingly.
Of course, since the name, “hummus” comes from the Arabic
word for chickpeas, one can make a strong argument that this isn’t hummus, and
therefore shouldn’t be called hummus. But those people don’t have to worry about
search engine results, which is why I just worked the word “hummus” into this
paragraph four times. Actually, let’s
make it five, as I say I really do hope you give this easy, and delicious
alternative hummus a try soon. Enjoy!
Ingredients for about 2 cups of Sweet Potato Hummus:
2 cups mashed, roasted sweet potatoes
1/3 cup tahini
2 cloves crushed garlic
1 teaspoon kosher salt, plus more to taste
1 teaspoon cumin
1/4 teaspoon chipotle
pinch cayenne
1 tablespoon olive oil
1/2 lemon, juiced, plus more to taste
2 tablespoons cold fresh water whipped in to lighten
texture, optional
Lamb borek is stunning to look at, and even more enjoyable
to eat, which is all thanks to, believe it or not, intentionally soggy dough.
This is something I didn’t grasp the first time I made it, and I just brushed melted
butter between the layers, hoping for something really crispy, and flaky, which
in Phylloland is standard operating procedure. However, since my dough was not
made flexible by the egg/yogurt/butter wash we used here, it basically exploded in like seven
spots when I tried to roll it up. Lesson learned.
Besides moisturizing the phyllo, this magic mixture also
adds flavor, thanks to the tangy yogurt; and the melted butter helps create a
fairly crispy exterior as well. So, while we don’t want to fully saturate the
sheets, a light brushing really does wonders. If you use a 9 or 10 inch round
pan like I did, three rolls should work out nicely, but this technique will
work no matter what you bake it on. You can also skip the spiral effect, and
keep them straight, or bend them into any other shape.
You’ll need a package of phyllo that provides at least 12 decent
sheets, and I really hope yours is better than the tragic box I bought.
However, as bad as mine was, it still worked out quite nicely, so I’m not exactly
sure why I’m complaining. Anyway, whether you make the recipe as listed, or
tweak the filling to your tastes, I really do hope you give this lamb borek
recipe a try soon. Enjoy!
Ingredients for 6 large portions:
(for one 9-10 inch round baking dish)
1 package frozen phyllo (filo) dough
2 teaspoons sesame seeds for the top, optional
For the lamb filling (you’ll have some leftover):
2 tablespoons olive oil
1 large onion, diced
2 pounds ground lamb
2 teaspoons salt, plus more to taste
4 cloves minced garlic
2 tablespoons currants
3 tablespoons toasted pine nuts
2 teaspoons ground cumin
1 teaspoon ground coriander
1 teaspoon cinnamon
1 teaspoon paprika
1 teaspoon freshly ground black pepper
1/2 teaspoon cayenne
1/4 teaspoon allspice
1 1/2 cups tomato sauce
1/4 cup water
For the egg/yogurt/butter wash:
1 large egg
3 tablespoons Greek yogurt
2 tablespoons water
2 tablespoon melted butter
For the yogurt sauce:
1/2 cup plain Greek yogurt
2 tablespoons very finely sliced mint leaves
lemon juice to taste
1 crushed garlic clove, optional
enough water to achieve desired texture
pinch of salt and cayenne
- Bake at 400 F. for 35-40 minutes, or until browned and
crisp.
Note: Save any extra phyllo, since the filling recipe above makes
extra, and you can fold up some smaller, triangular boreks if you want.
As I may have mentioned on Twitter several times, Michele
and I have both been sick all week, so please pardon the lateness, and brevity
of this post. The good news is this Greek-style baked beans recipe is very
simple, and there’s not a lot of extra info I need to pass along.
One thing I will mention is that while these are baking, be
sure to peek once in a while to see if you need to add more liquid. You can
bake covered, but then you don’t get the crustification on top, so I prefer to
bake uncovered, and stir in a splash of water, or two, if it looks like it’s
getting too dry.
If you can find gigante beans, they really are the best, but
Conona beans also work great, as will any other large dried bean. Just be sure
to soak them properly, and simmer them until tender before proceeding to the
baking step. Now, if you’ll excuse me, I’m climbing into my big, fat bed.
Enjoy!
Ingredients for 12 portions:
1 pound dried Gigante, Conona, Lima, or other large dried bean (soaked
overnight)
3 quarts cold fresh water to boil in
2 bay leaves
1 large red onion, diced
3 cloves garlic, sliced
2 cups tomato sauce or finely chopped fresh tomato
2 tablespoons tomato paste
3 tablespoons clover honey
1/2 cup chopped fresh dill, plus more for the top
1 tablespoon kosher salt (2 teaspoon if using fine table
salt)
1 teaspoon freshly ground black pepper
cayenne to taste
1/2 cup extra virgin olive oil
1/4 cup red wine vinegar
2 cups water, plus more as needed while baking 4 ounces feta cheese for the top
“Karniyarik” means “split belly,” which refers to the
technique used to stuff them, although depending on the size of your eggplant,
it could also refer to you after enjoying this delicious dish. By the way, this
was my first time making these, and when I mentioned in the video only doing 15
minutes of research before filming, I wasn’t joking. So, you’ve been warned.
Having said that, I thought these came out really well, and
I would only tweak a couple minor things next time. I’d sprinkle the insides
with salt before stuffing, since there wasn’t enough in my filling to season
them to my taste. I’d also toss in some chopped parsley, which would have added a
little freshness to the dish, although the dried rosemary did work nicely.
Lastly, I’d take the advice I got on Twitter, and serve
them with a yogurt sauce, like our famous tzatziki. That would be an amazing
condiment for these, since the cold, acidic sauce would be a perfect foil for the
rich, aromatic, slightly sweet flavor profile.
Since I’m fully
admitting not knowing what I’m doing, I welcome any and all tips and tricks,
but most of all, I really do hope you give these a try. Enjoy!
Ingredients for 4 Turkish Stuffed Eggplant (Karniyarik:
4 medium sized eggplant
olive oil as needed
1 yellow onion, diced
1 teaspoon kosher salt, plus more to taste
4 cloves garlic, crushed
1 teaspoon freshly ground black pepper
1 teaspoon ground cumin
1/2 teaspoon cinnamon
1/4 teaspoon cayenne
1/2 teaspoon dried rosemary
1/4 cup freshly chopped Italian parsley (I didn’t add, but
you should)
2 tablespoons tomato paste
1 pound ground lamb or beef 1 1/2 cups diced sweet and/or hot peppers
1 ounce (about 1 cup unpacked) finely, freshly grated
Pecorino cheese, or whatever you’re into
1 cup chicken broth
- Roast eggplant at 400 F. until just barely soft, stuff,
and continue baking until very tender.
I really loved everything about this feta roast chicken, as
long as I was eating with my eyes closed, and that’s because despite the juicy
texture, and wonderful flavor, I had trouble getting past the grainy-looking appearance
of the cooked cheese mixture. The good news is, it was mostly an aesthetic
issue, and the mouthfeel wasn’t nearly as dry and grainy as it looked. Having said that, the next time I make this I will probably
go with a little higher-end sheep’s milk feta which is much softer, and
creamier. Speaking of the feta, you may need to add some salt to the mixture,
depending how salty the one you use is.
As usual, your roasting time will depend on the size of your
chicken, and the feta under the skin will increase the time needed, so check
with a thermometer, and shoot for 155-160 F. in the thickest part of the thigh.
Surprisingly, even though the feta was only under the breast, the thighs
did actually pick up some of the flavor, which is enhanced even further if you create a simple pan
sauce from the drippings.
While your chicken is resting, pour off all, some, or none
of the fat from the pan, and squeeze in your lemon. Set over medium heat, and
use the juice to deglaze the browned bits from the bottom of the pan. You may
need/want to add a splash of broth or water, but once hot, and adjusted for
seasoning, it’s ready to spoon over your sliced chicken. For an experiment, I
thought this was very successful, if not triumphantly so, and I do hope you
give it a try soon. Enjoy!
Ingredients for one large whole chicken:
1 large whole chicken
kosher salt, as needed
a few fresh rosemary and oregano sprigs
2 teaspoons olive oil for coating chicken
cayenne to taste
For the feta cheese mixture:
4 ounces feta cheese
3 garlic cloves, crushed
1/2 teaspoon red pepper flakes, or to taste
1 teaspoon freshly ground black pepper
zest from one lemon (save juice for pan sauce)
2 teaspoon dried oregano
3 tablespoons olive oil, or enough to make a smooth paste
If you’ve made and loved our Greek Lemon Chicken, and
Fondant Potatoes, then you will absolutely adore these lemon pepper potatoes,
since it’s basically the best of those two recipes put together, minus the
chicken. The only problem is, whatever main course you decide to go with is in serious danger of being upstaged.
Speaking of chicken, if you happen to be roasting one,
besides keeping the bones for stock, be sure to save the rendered fat as well,
since that will elevate this dish to even greater heights. Also, feel free to
add some garlic here, but if you do, I’d go with whole cloves, since minced
garlic may burn onto the bottom of the dish towards the end of the roasting
time.
These are incredible eaten hot and fresh, but if for some
reason you don’t finish them all, they make the best homefries you’ll ever eat.
Just cut them up, and fry in some olive oil until crispy. They’re so good,
you’ll be tempted to make them just for that purpose, although that will take
way more willpower than I possess. Regardless, I really do hope you give these
Lemon Pepper Potatoes a try soon. Enjoy!
Ingredients for 8 Portions Lemon Pepper Potatoes:
4 large russet potatoes
salt, freshly ground black pepper and cayenne to taste
1/4 cup olive oil, or enough to cover bottom of baking dish
fresh oregano springs, optional
1 cup chicken broth
2 teaspoons lemon zest
juice from 1 or 2 lemons
- Roast at 400 F. for 20 minutes, flip and cook another 15
min., then flip again, and continue roasting until very tender and crusty.
I had a feeling I wasn’t the first person to think of this
cinematic play on words, but like I said in the video, so many other people called
this a big fat Greek salad, I figured I wouldn’t get in too much trouble. If I
had to guess, it was probably the caterer on the set of the movie who first
coined the name, or at least I hope so.
This is such a simple salad that there’s no need for me to
share a bunch of tips and tricks, although I will reiterate the most important
instruction of all.Be sure to toss the
salad with the vinegar first, before adding the olive oil. If you don’t, it
will not taste as good. Which reminds me, giving the amounts here is very
difficult, since this really should be made to your tastes, so please use the
ingredient list below as a very rough outline.
If you need to make this the day before, I suggest making
the dressing separate, and then mixing everything before the event.I think this should only be dressed about 30
to 60 minutes before service for maximum enjoyment, but that’s just my approach,
and some folks prefer an overnight marination. Regardless of how long you let
your ingredients “marry,” you’re going to be enjoying one amazing salad, which
is why I really do hope you give this a try soon. Enjoy!
Ingredients for 1 Big Fat Greek Salad:
2 large English cucumbers
2 cups halved cherry tomatoes
1/4 red onion, thinly sliced
1/2 red bell pepper, diced
1 cup sliced olives
2 tablespoons minced fresh oregano, or 1/2 teaspoon of dried
salt, freshly ground black pepper, cayenne to taste
I usually try to squeeze in one more sexy dessert video
before Valentine’s Day, but instead I opted for this show-stopping, and super-savory
saganaki. What it lacks in chocolate, it more than makes up in being on fire. I
know what you’re probably thinking… what about a flaming chocolate dessert? Maybe next
year.
In case you’re wondering, the original saganaki was not
flambéed. This flaming cheese ritual was started by restaurateurs in Chicago,
who were hoping a little bit of showmanship would help increase cheese
appetizer sales, which it certainly did. They also made the experience
interactive by encouraging customers to yell, “Opa!” as the plate was being
ignited. If there’s one thing people love even more that flaming fried cheese,
it’s yelling.
I really love kasseri cheese for this, since it holds its
shape, crusts up nicely, and melts beautifully. I’ve also done this with a
cheese called haloumi, which is tasty, but doesn’t melt at all, and for me
that’s the best part. Beside those two, you can also use graviera,
kefalograviera, kefalotyri, or even a firm feta cheese. No matter which cheese
you use, I really do hope you give this a try soon. Enjoy!
Ingredients for 2 large portions:
4 ounce slab of kasseri cheese (about 3/8 inch thick), or
other cheeses listed above
Assuming you haven’t used up all your homemade filo dough already, as promised, here’s my method
for building what I think is a beautiful baklava. Like lasagna, there are as
many versions of this, as there are cooks who make it, but regardless of the
exact ingredients, or specific number of layers, the technique is the same.
I tend to enjoy a generous ratio
between nuts and pastry, as that makes me feel a little bit better about the
copious amounts of sugar in this, but above and beyond that, I think this
approach produces the best texture. As I mentioned in the video, you can
use as many layers of filo as you want, but be careful, since too many may not
cook through, and the only way to mess this up is to undercook the dough. The top
and bottom layers need to dry out, and thoroughly crisp up, otherwise, once the
syrup gets ladled over, you’ll have a soggy mess.
I would start peeking at it after about
45 minutes, but it’s probably going to need closer to an hour, or even more,
depending on how much “stuff” you used. Once done, and finished with the syrup,
you need to let this cool down to room temp, which is incredibly hard to do.
But, your patience will be rewarded with one of the most delicious things known
to man. I really hope you give this a try soon. Enjoy!
Makes one 9-inch round Baklava:
*Note: I don’t know how this translate to different size
pans, but I’m sure you’ll figure that out.