That's right! I'm on vacation for the rest of the week, and the beginning of the next, which usually means a lot of rest and relaxation, but not this time. That's because Michele and I are going to be working harder than ever on a major, top secret personal project. No, not a cookbook, or a TV show, or anything else that you'd probably guess, but major nonetheless. We can't share the details just yet, but I can say it's going to be an exciting Fall! In the meantime, enjoy a few reruns, and I'll be back with a new video before you can say, "Kismet."
The Philly Cheesesteak is a simple
sandwich to make, as long as you’re making them in a restaurant. To make a
proper one, you need a professional meat slicer, and a very hot flattop grill,
which aren’t things most people have at home.
That’s why I loved this baked
slider method so much. It’s really close in taste and texture, plus, as I
mentioned in the video, the small rolls make me feel like a big man.
I love the combo of provolone and cream
cheese here, but if you’re a Cheese Wiz head, you can easily switch in some
mild orange cheddar, and you’ll swear you’re at Pat’s. Of course, you could
just skip the cream cheese, and actually use Cheese Whiz, but I really hope you
don’t.
Speaking of feeling like a giant, football season is upon
us, and I can’t think of a better sandwich to make for your buddies coming over
to watch the game. Especially if they’re from Philly, and don’t like the
Giants, since you can share my theory with them. Regardless, I really do hope
you give these baked Philly cheesesteak sliders a try soon. Enjoy!
Ingredients for 10 Baked Philly Cheesesteak Sliders:
10 mini sandwich rolls, or crusty not-sweet dinner rolls
1 tablespoon olive oil
1 pound top sirloin steak
salt, freshly ground black pepper, and cayenne to taste
1/2 cup diced onion
1/2 cup sliced, or chopped pickled peppers
1/2 cup soft cream cheese
1 1/2 cups provolone cheese for filling, plus at least 1 cup
more for tops
1 teaspoon kosher salt
1/4 teaspoon freshly ground black pepper
Note: Be sure to taste your filling for salt before stuffing
rolls
One of my all-time favorite comfort food meals growing up
was the beef goulash served in my school cafeteria, which came with a slice
of buttered white bread, and an ice-cold carton of milk. Little did I know that
it wasn’t really goulash, but an Americanized version, invented, I’m guessing,
to stretch a small amount of beef into enough food for a not so small family.
Real goulash is like a beef stew, and I’m pretty proud of
this version we posted a while back, but while it’s a wonderful recipe in its
own right, it just doesn’t hold the same place in my heart as this version. So,
you can imagine my disappointment the first time I ordered beef goulash, and
actually got beef goulash. Anyway, live and learn.
Not much can go wrong here, as long as you don’t under-cook,
or horribly over-cook the macaroni. So, set your timer for 10 minutes, and
start checking. We want the pasta very tender, but not falling apart. By the
way, this goes by many names, including American Chop Suey, Chili Mac, Johnny Marzetti,
and my personal favorite, Slumgullion. No matter what you call this, I
really do hope you give it a try soon. Enjoy!
Ingredients for 6 portions:
1 tablespoon olive oil
1 large onion, diced
2 pounds ground beef
4 cloves garlic minced
2 generous teaspoons kosher salt, plus more to taste
1/2 teaspoon black pepper
cayenne to taste
2 tablespoons paprika
2 teaspoons dried Italian herbs (blend of oregano, thyme,
rosemary, sage, parley, basil)
1 or 2 bay leaves
1 quart chicken broth
1 (15-ounce) can diced tomatoes
1 (24-ounce) jar prepared marinara sauce, rinsed with 1 cup
water
When people grow cherry tomatoes for the first time, they
often make the mistake of planting more than one or two bushes, which a few
short months later usually means a ridiculously large harvest, as in more
cherry tomatoes than you can possibly use. Well, this cherry tomato and cheese
galette might help, a little.
While “galette” sounds a little fancy, they’re actually one
of the easier type of pies to make, and above and beyond the simple technique,
they are incredibly adaptable to whatever is in season. Whether that’s sweet
fruit, or savory vegetables, there are very few things you can’t galette.
Just be sure to bake them long enough, since the bottom
needs to brown, as well as you want whatever filling you’re using to dry out a
bit. Your oven time will vary depending on the exact size and shape of your
galette, so once you take it out, peak underneath to make sure it’s browned. Basically,
you should bake this as long as you possibly can, without it burning, so be
brave.
This will also work with larger, sliced tomatoes, but just
be careful you let them drain on some towels first. Other than that, there’s
not much else to worry about, except what to do with those other 5 pints of
cherry tomatoes. Even if you have to go to the store to buy yours, I think this
is well worth the trip, and I really do hope you give this cherry tomato
galette a try soon. Enjoy!
Ingredients for one 12-inch pizza pan sized galette:
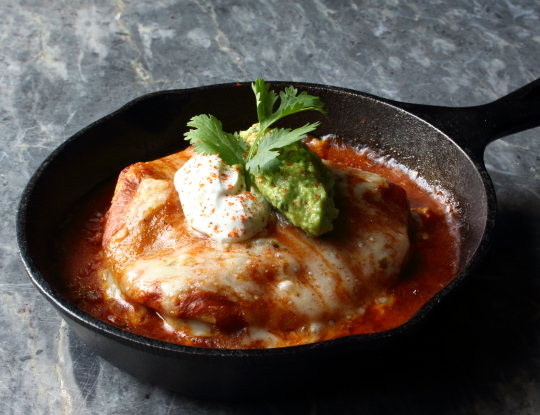
I’ve wanted to do a homemade red enchilada sauce video for a
while now, and not just one. Eventually, I need to film a proper Mexican-style
enchilada sauce, but first, may I present the faster, easier, but still very delicious,
Tex-Mex version. Speaking of faster, I thought by stacking these, they’d be a little
quicker to make, but they took the same time as rolled ones. That means they’re
both fast and easy.
Since we are taking the shortcut of using dried chili
powder, be sure to at least get a nice one. I used ground Ancho, which is very
nice, but what isn’t nice is that old bottle of chili powder you’ve had in the
pantry since the 90’s. If you live in some remote location, go on the Internet
and order something fresh. Besides using it in this, your next pot of chili will also be grateful.
If you’re making the sauce ahead of time, it’s a good idea
to heat it up first before assembling your enchiladas, so they are warm going
in the oven. Otherwise, you’ll need to give them some extra time in the oven,
so they get completely heated through. I love chicken enchiladas more than
someone probably should, but this same preparation done with shredded, stewed
beef, is not to be missed. Either way, I really do hope you give these a try
soon. Enjoy!
Ingredients for 2 1/2 cup Red Enchilada Sauce:
(enough for 4 to 6 Portions)
2 tablespoons olive oil
2 tablespoons butter
1/2 cup diced onion
1/2 teaspoon salt, plus more to taste
3 to 4 tablespoons all-purpose flour, depending on how thick
you like it
2 tablespoons ground chili powder, like ancho
2 teaspoons ground cumin
1/2 teaspoon chipotle
1/2 teaspoon freshly ground black pepper
1/4 teaspoon dried oregano
cayenne to taste
small pinch cinnamon
3 cloves minced garlic
2 tablespoons tomato paste
2 1/2 cups chicken broth
Fillings for each enchilada:
3 small corn tortillas
2/3 cup shredded cooked chicken
2/3 cup shredded pepper or regular Monterey Jack cheese, plus
more as needed
If you don’t do a lot of cooking, this confetti rice salad
recipe might be the kind of thing you disregard, since it probably appears to
require lots of slicing and dicing, which is true, but that’s a bad reason to
not make it. That would be like not using real confetti for your celebration
because it’s hard to clean up.
The truth of the matter is, with very little practice, all
the veggies for this salad can probably be prepped in less than 15 minutes. In
fact, this would be a great recipe to set your benchmark, and then see how you
improve over time. Or, just use a food processor to chop everything. Either
way, it’s worth the effort.
Obviously, you can adapt this recipe a thousand different
ways, and I’m not just talking about which vegetables you toss in. If you want
something creamier, you can add some mayo, or sour cream, or any combination of
both. If you do, I’d cut back on the oil and vinegar a bit, but either way,
make sure you hold back some of whatever you’re dressing this with.
Any dressing you add before it goes in the fridge will be
full absorbed, and I think the texture is much nicer if we moisten the salad
with more before service. That’s up to you also, but we don’t want our confetti
rice as dry as the real stuff. Other than that, not much can go wrong, and I
really do hope you give this a try soon. Enjoy!
Ingredients for 12 portions:
2 cups white long grain rice
1 teaspoon kosher salt
2 tablespoons olive oil
3 cups boiling water
- Place in 9 x 12 baking dish, cover, and cook rice for 35
minutes, then let rest 10 minutes, before fluffing.
1/2 cup green peas
1/2 cup sliced blanched green beans
1/2 cup finely diced blanched carrots
2 large red bell pepper, finely diced
1 large orange bell pepper, finely diced
1/4 cup sliced green onions
1/4 cup red onions
2 teaspoons kosher salt, plus more to taste
cayenne to taste
3/4 cup sherry and/or rice vinegar (add 1/2 cup before
fridge, and 1/4 cup after)
3/4 cup olive oil (add 1/2 cup before fridge, and 1/4 cup
after)
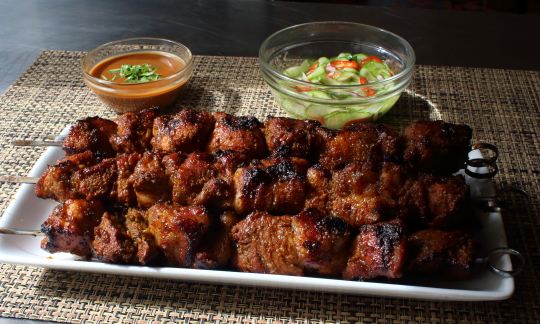
I’m not exactly sure how much pork satay they eat in Penang,
or if they flavor it like I do here, but I’m fairly confident that if I handed
one of these skewers to your average pork-loving Malaysian, they would enjoy
it. By the way, I did a search, and there’s actually a restaurant in Penang
called, “Penang Pork Satay.” It doesn’t get great reviews, but if you’ve
happened to try it, please let me know how this compares.
Like I said in the video, a satay marinade usually gets a
splash of coconut milk, but I think it’s perfectly fine without. Besides adding
a little sweetness, it also apparently helps tenderize the meat, but we have
both those things covered here, with the sugar, ginger, and turmeric. Of
course, by opening a can, you’ll force yourself to make curry with the rest, so
either way is a win.
As far as the grilling time goes, we simply want to cook it
through, and then stop, which is going to happen in a relatively short amount
of time. That’s what I like a fairly large size chuck of pork, so we have enough
time to get that beautifully brown, crusty exterior. If you don’t have, or can’t
use a grill, you should definitely make this anyway. It would work just about
the same under a broiler set on high, or roasted in a 500-degree oven. Regardless
of how you cook it, or whether you tweak the ingredients, I really do hope you
give this a try soon. Enjoy!
2 1/2 to 3 pounds boneless pork shoulder, cut into 1.5-inch
cubes
1 tablespoon kosher salt
For the marinade:
2 to 3 inch piece of fresh turmeric root, peeled, sliced or 2
teaspoons ground turmeric
2-inch piece ginger root, sliced
1 large or 2 small shallots
8 to 10 garlic cloves
1/4 cup light brown sugar
3 tablespoons ancho or other ground chili powder
2 teaspoons ground coriander
1 teaspoon chipotle
1/2 teaspoon cayenne
1/4 cup rice vinegar
2 tablespoons soy sauce
1 tablespoon fish sauce
1 teaspoon tamarind paste
1/2 cup packed cilantro leaves and stems
- Mix and marinate for 4 to 18 hours, then grill until
cooked through.