And, as always, enjoy! If you want more information about why the blog format has changed, and why we're now offering complete written recipes, please read all about that here.
And, as always, enjoy! If you want more information about why the blog format has changed, and why we're now offering complete written recipes, please read all about that here.
And, as always, enjoy! If you want more information about why the blog format has changed, and why we're now offering complete written recipes, please read all about that here.
And, as always, enjoy! If you want more information about why the blog format has changed, and why we're now offering complete written recipes, please read all about that here.
And, as always, enjoy! If you want more information about why the blog format has changed, and why we're now offering complete written recipes, please read all about that here.
And, as always, enjoy! If you want more information about why the blog format has changed, and why we're now offering complete written recipes, please read all about that here.
And, as always, enjoy! If you want more information about why the blog format has changed, and why we're now offering complete written recipes, please read all about that here.
There’s no way to actually win an argument about which pasta sauce or pasta dish is Italy’s best, but that’s not really the point. Arguing is fun, especially with Italians, and just being able to passionately make your case, more than makes the effort worthwhile. I tried to do that in this Pasta all’Amatriciana video, although it was really more... to read the rest of Chef John's article about Pasta all’Amatriciana,please follow this link to become a member.) Follow this link to get a complete, printable written recipe for Pasta all’Amatriciana!
And, as always, enjoy! If you want more information about why the blog format has changed, and why we're now offering complete written recipes, please read all about that here.
And, as always, enjoy! If you want more information about why the blog format has changed, and why we're now offering complete written recipes, please read all about that here.
And, as always, enjoy! If you want more information about why the blog format has changed, and why we're now offering complete written recipes, please read all about that here.
And, as always, enjoy! If you want more information about why the blog format has changed, and why we're now offering complete written recipes, please read all about that here.
I remember joking around in our homemade ketchup video about how even though the final product was great, and very close to the store bought stuff, it wasn’t worth all the time and effort; and that people should probably just continue buying it at the store. Well, you might be thinking the same thing about... to read the rest of Chef John's article about All-American Barbecue Sauce,please follow this link to become a member.)
And, as always, enjoy! If you want more information about why the blog format has changed, and why we're now offering complete written recipes, please read all about that here.
And, as always, enjoy! If you want more information about why the blog format has changed, and why we're now offering complete written recipes, please read all about that here.
When people think comfort food, they generally think of
classic, iconic recipes that are made the exact same way every time. No one
likes change, and it’s this timeless consistency that in large part makes these
dishes so comforting. However, as much as I love a traditional beef stew, or
braised beef short ribs, once in a while, I enjoy using these same techniques
with a few non-traditional ingredients, just to shake things up.
Speaking of which, if you’re not familiar with miso, it's a fermented soybean and rice paste, and it just
makes everything taste better. It’s
relatively easy to find in your larger grocery stores, and a few spoonfuls will add
an extra element of savoriness to these already savory dishes. To balance that,
among other things, we’re also adding a touch of maple syrup, which helps give this even more of an autumnal feel.
I kept things pretty simple with the vegetable additions,
going with just mushrooms and onions, but the classic beef stew array of carrots,
celery, onions, and potatoes would also work as well. And I wasn’t kidding
about the King Trumpet mushrooms being as good as the beef. They really were
amazing, and this would make for a fantastic meatless meal using those alone.
Either way, I really do hope you give this a try soon. Enjoy!
Ingredients for 4 portions Miso Braised Beef:
2 tablespoons peanut, or vegetable oil
2 1/2 pounds beef chuck, or boneless beef short ribs, cut
into 2-inch thick strips or chunks, seasoned with salt, freshly ground black
pepper, cayenne
1 tablespoon butter
3 or 4 King Trumpet mushrooms, halved, or any mushrooms
I’ve wanted to do a homemade red enchilada sauce video for a
while now, and not just one. Eventually, I need to film a proper Mexican-style
enchilada sauce, but first, may I present the faster, easier, but still very delicious,
Tex-Mex version. Speaking of faster, I thought by stacking these, they’d be a little
quicker to make, but they took the same time as rolled ones. That means they’re
both fast and easy.
Since we are taking the shortcut of using dried chili
powder, be sure to at least get a nice one. I used ground Ancho, which is very
nice, but what isn’t nice is that old bottle of chili powder you’ve had in the
pantry since the 90’s. If you live in some remote location, go on the Internet
and order something fresh. Besides using it in this, your next pot of chili will also be grateful.
If you’re making the sauce ahead of time, it’s a good idea
to heat it up first before assembling your enchiladas, so they are warm going
in the oven. Otherwise, you’ll need to give them some extra time in the oven,
so they get completely heated through. I love chicken enchiladas more than
someone probably should, but this same preparation done with shredded, stewed
beef, is not to be missed. Either way, I really do hope you give these a try
soon. Enjoy!
Ingredients for 2 1/2 cup Red Enchilada Sauce:
(enough for 4 to 6 Portions)
2 tablespoons olive oil
2 tablespoons butter
1/2 cup diced onion
1/2 teaspoon salt, plus more to taste
3 to 4 tablespoons all-purpose flour, depending on how thick
you like it
2 tablespoons ground chili powder, like ancho
2 teaspoons ground cumin
1/2 teaspoon chipotle
1/2 teaspoon freshly ground black pepper
1/4 teaspoon dried oregano
cayenne to taste
small pinch cinnamon
3 cloves minced garlic
2 tablespoons tomato paste
2 1/2 cups chicken broth
Fillings for each enchilada:
3 small corn tortillas
2/3 cup shredded cooked chicken
2/3 cup shredded pepper or regular Monterey Jack cheese, plus
more as needed
I’ve wanted to film a skewered version of our chicken teriyaki
recipe for a while, but it was actually a karaage I recently enjoyed that
pushed me into action. Michele and I were at Ramen Gaijin in
Sebastopol, where they serve an amazing chicken karaage that comes with
a miso ranch dipping sauce. The cool, tangy sauce is just perfect with the
fried nuggets of chicken, and I assumed (correctly so, as it turns out) that it
would be just as effective with these skewers.
None of the ingredients below are very hard to find, and any
large grocery store should have Sake, and Mirin, as well as probably several
kinds of miso. I used a “white miso,” which is actually gold in color, but
apparently the “white” refers to the rice content, which is the other main
ingredient besides soybeans. Feel free to make the dressing without it, but its
fermented savoriness is such a great addition, I’d at least make some effort to
track it down.
As far as the chicken goes, there’s not a lot that can go
wrong, but I’d caution against an extra long marination. Especially if you’re
skewering small chunks like we did here. The meat will “cure” in the sweet,
salty mixture, which can make for an odd texture once cooked, as well as the
meat is more likely to start falling apart. Personally, I think about four
hours is ideal, which is perfect, since you can marinade in the morning, and
then grill in the afternoon. Regardless of these variables, I really do hope
you give both these incredible recipes a try soon. Enjoy!
Ingredients to make about 12 small skewers:
2 pounds boneless skinless chicken thighs, cut into 3 or 4
chunks each
1/2 cup soy sauce
1/2 cup sake
1/3 cup mirin (Japanese sweet wine)
2 tablespoons finely minced green onions
2 teaspoons finely grated ginger
1/4 cup brown sugar
1 tablespoon vegetable oil
For the Miso Ranch:
3/4 cup mayonnaise
1/3 cup buttermilk
1/4 cup sour cream or crème fraiche
1 generous tablespoon white miso paste, or to taste
Remember that time you waited all day for your “low and
slow” beef brisket to finish cooking, and once it finally did, it was dry? It
left you disappointed, disillusioned, and wondering what went wrong. Well, I
won’t bore you with all the scientific, easy-to-Google details, but basically
meat can “stall” during long, low-heat methods, and never reach the proper
internal temperature to fully release all the succulent goodness.
If you really nail it, the results can be amazing, and I’ve
gotten lucky a few times on the smoker, but this significantly faster method is
much less risky. Unless you really overcook it, you shouldn’t have to worry
about dry meat, and you can instead worry about other things, like whether you
cooked enough meat. By the way, I'm not sure if they invented it, but I adapted
this from something I saw watching an America's Test Kitchen rerun, so if you
have issues, please contact them.
Speaking of enough meat, if you decide to use a whole
brisket, this method will work as shown, but you’ll probably need to give it a
little more time at the end to ensure it’s fork tender. Or not, but there’s
only one way to find out, so have your poking fork handy, and use as needed.
Whether you’re looking for a brisket recipe for Passover, or you’re simply
interested in moister meat in less time, I really hope you give this easy,
baked brisket recipe a try soon. Enjoy!
Ingredients for 6 portions Easy Baked Beef Brisket:
(Adapted from America's Test Kitchen)
3 pound beef brisket (the flat half of a full brisket)
4 teaspoons kosher salt
2 teaspoons freshly ground black pepper
1/2 teaspoon cayenne
For the gravy/braising liquid:
2 tablespoons butter, oil, or rendered fat
1 large yellow onion, sliced
1 teaspoon kosher salt
4 cloves garlic, sliced
1 tablespoon minced fresh rosemary
1 cup apple juice or cider
- Bake at 325 F. for 1 1/2 hours, then reduce oven to 250 F.,
and cook for about 2 hours 15 minutes, or until fork tender.
This amazing Hawaiian comfort food classic is made by
topping rice with a fried burger, which is then smothered with a rich, brown
gravy, and finished with a fried egg. Seriously, how did it take until 1949 for
someone to think of this combination? And, once they did, why exactly did they
name it, “crazy mucus,” which is what this actually translates to.
I’ll let you read all about that here, but disturbing names
aside, this really is a cheap, filling bowl of goodness, that can be adapted in
all sorts of ways. The beef patty is standard, but spam is also used, as is
roast pork, and even seafood.
I like the classic burger best, although as I mentioned in
video, I do recommend using a thinner patty, around 4 ounces, which will make
this easier to eat, as well as provide a better beef-to-rice-to-gravy ratio. I
had a pound of meat and decided to make two portions, but in hindsight I should
have saved half for something else.
Of course, you’re having a pretty good week when you’re
complaining that your burger was too thick for your loco moco. Anyway, I hope
you had a great week as well, and that you give this fast, and very satisfying Hawaiian
classic a try soon. Enjoy!
Ingredients for 2 portions:
1 teaspoon unsalted butter for cooking the burger
2 ground beef patties (4 to 6 ounces is ideal)
salt, freshly ground black pepper, cayenne to taste
2 tablespoons minced green onions (white/light parts)
2 cup cooked white rice
2 fried egg
sliced green onions to garnish
For the gravy:
1 1/2 cups high-quality beef broth
4 teaspoons soy sauce
1 teaspoon Worcestershire sauce
few drops of sesame oil, optional
2 teaspoons ketchup
2 teaspoons sugar
4 teaspoons cornstarch (or a little more if you want a
thicker sauce)
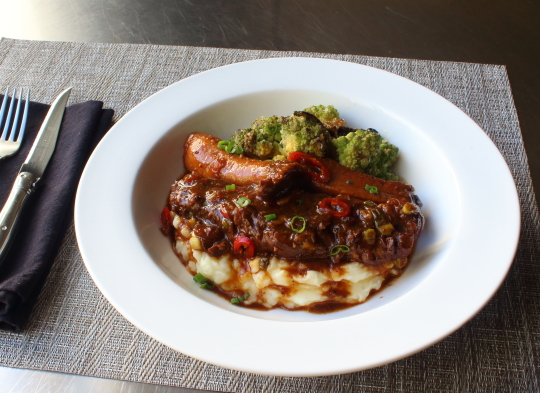
"Agrodolce” is a very generic Italian term for any type of sweet
and sour condiment, and while it’s used on all sorts of things, it really
shines, both literally and figuratively, when used for braising chunks of
succulent pork shoulder. This really was a thoroughly enjoyable, soul-warming
dish of comfort food, which is why I was so amused by how much it made me think
of summer cooking.
I’m not sure if Italians “barbecue,” like we do here in the
States, but this sauce very much reminded me of something we’d brush on a rack
of ribs while sipping a cold beer. So, don’t be surprised if you see something
like that happen once the weather warms up. In fact, a little touch of
smokiness was maybe the only thing this dish was lacking, and we could have
taken care of that with a little smoked paprika. Next time.
As I mention in the clip, once the meat is tender, and ready
to serve, you’re going to have to decide whether to skim the fat. I’ll leave
that decision to you and your medical team, but if you do, here are a few tips.
It’s hard to skim rendered fat while it’s still in the baking dish, so I
usually remove the meat, and pour the sauce into a measuring cup, or small
saucepan. That way, we have much less surface area, and it’ll be way easier to
spoon off the top. Also, if you make this ahead of time, and chill it
overnight, the fat will harden, and you can easily remove it from the surface.
Either way, this pork agrodolce is amazing served on rice,
pasta, polenta, or as I teased in the video, a big pile of ricotta mashed
potatoes. In fact, I enjoyed those so much that if, and when, I adapt this
sauce to the summer grill, I’m still going to use that as a side. But, no
matter how you serve it, I really hope you give this it a try soon. Enjoy!
Ingredients for 4 large portions Pork Agrodolce:
3 1/2 pounds boneless pork shoulder, cut into 3-inch chunks
2 tablespoons tomato paste
1/3 cup balsamic vinegar
1/4 cup distilled white vinegar
3 tablespoons honey
1 or 2 anchovy fillets mashed
2 cloves minced garlic
1/4 cup green onions
1 tablespoon minced fresh rosemary
1 tablespoon kosher salt, plus more to taste
1 teaspoon red chili flakes
1 teaspoon freshly ground black pepper
- Roast at 325 F. for about 2 1/2 to 3 hours, or until very
tender.
Note: While roasting, you can add a splash of water to the
baking dish if things are drying out, and/or you can cook this covered after
the meat has had time to brown. As long as the pork gets tender, and you’re
left with enough agrodolce sauce to coat the meat, you did it right.
Trying to convert a fried recipe into a baked one is usually
a disappointing exercise in futility, but this crispy garlic breadcrumb chicken
turned out to be a very enjoyable exception.
While not exactly the same as a pan-fried,
breaded cutlet, if you want to eat tender, flavorful chicken with lots of
crispy, crunchy bits, then this significantly less-messy method is for you.
One of the keys to this technique is to use panko
breadcrumbs, which are much larger, and more jagged than regular, fine
breadcrumbs. If you can’t find them, you can easily make you own. Just pulse
chunks of stale white bread in a food processor until coarsely ground, and then
spread out on a baking sheet, and place in a 275 F. oven until they are dried
and crispy.
Above and beyond being easier, this method also allows us to introduce some additional flavor, and moisture, thanks to the “glue” we use to
attach the crumbs. I went very simple with my formula, but as I mention in
the video, you can add all sorts of herbs and spices to yours. Either way,
the next time you want crispy, breaded chicken with less mess, and more flavor,
I really do hope you give this a try. Enjoy!
Ingredients for 2 portions:
2 large boneless, skinless chicken breasts (about 8-10
ounces each)
salt, freshly ground black pepper and cayenne to taste