And, as always, enjoy! If you want more information about why the blog format has changed, and why we're now offering complete written recipes, please read all about that here.
And, as always, enjoy! If you want more information about why the blog format has changed, and why we're now offering complete written recipes, please read all about that here.
And, as always, enjoy! If you want more information about why the blog format has changed, and why we're now offering complete written recipes, please read all about that here.
I’ve always made fun of “scary” Halloween recipes, since they are never, ever, actually frightening (with the one notable exception being our infamous “Face Pie”), but I have to say, these do sort of creep me out. Maybe it’s their tortured scream facial expressions, or horribly dirty sheets, or my upcoming cholesterol screening, but I found these to be... to read the rest of Chef John's article about Mini Meatloaf Ghosts,please follow this link to become a member.) Follow this link to get a complete, printable written recipe for Mini Meatloaf Ghosts!
And, as always, enjoy! If you want more information about why the blog format has changed, and why we're now offering complete written recipes, please read all about that here.
The holidays are almost here, which means “show-off” baking
season is almost here, and these pumpkin-shaped dinner rolls are just the thing
to impress your guests, and more importantly, drive your culinary rivals mad
with envy. Sure these take about 20 minutes longer to make than your already
perfectly fine dinner rolls, but that’s nothing when you consider all the
compliments that will be coming your way.
This very Instagram-friendly roll is the perfect thing to
bring to that holiday gathering, and can be made using your favorite dinner
roll recipe. The key here is well-oiled string, and being careful not to tie it
too tightly. If the string gets embedded too deeply into the dough, it will tear
the roll when you try to remove it, and there’s nothing that stops something
from being cute, quite like a jagged tear.
By the way, if you don’t feel like tying all those knots,
you can try and do this with one long piece of string, winding it around the dough
ball, as you turn it, but I find that method harder, and less successful.
Faster yes, but not as visually appealing once baked.
If you do a video search for this type of roll, you’ll also
see people simply cutting slashes around the outside, which sort of works, but
it just doesn’t come out as adorable. But, regardless of which roll recipe, or
shaping method you use, I really do hope you give these pumpkin-shaped dinner rolls
a try soon. Enjoy!
Ingredients for 12 “Pumpkin” Dinner Rolls: (be sure to save a few tablespoons of dough for the stems)
1 cup warm milk
1 package dry active yeast
1 or 2 tablespoons honey
4 tablespoons melted butter
3 cups flour, plus more for kneading
1 teaspoon fine salt
kitchen string
vegetable oil for strings
- Bake at 375 F. for 20-25 minutes
- Feel free to give these an egg wash before baking if you
want a shinier look.
If you’re thinking of dry-aging your very own Prime Rib of
Beef for the holidays, then you really need to watch this video. You might
learn a thing or two, and there’s even a chance you’ll still want to do it. By
the way, I’m not trying to discourage you, since it is a fun, and fascinating
foodie project, which does produce a delicious, juicy, and tender Prime Rib,
but if you’re after “that funk,” then like me, you may be a little
disappointed.
I’ve dry-aged meat before, but never longer than a week or
so, and after doing lots of research (mostly on Serious Eats), I knew I’d have
to go at least 30 days to enjoy any kind of noticeable change in favor. So I
decided to go well past that, and ended up aging it for 42 days before it went
into the oven. It looked great, and it smelled great, but ultimately it did not
have the level of funky fermented goodness I was after.
I’m not sure if I needed to go even longer, or my garage
fridge is lacking in desirable bacteria, or my saltwater wipe-down sterilized
the surface, but whatever the reason, I was left with nothing more than an
amazingly juicy, tender, and delicious Prime Rib. That’s not something you’d
normally complain about, but after waiting 6 weeks, I wanted more.
So, if you have any advice or theories as to what happened,
or didn’t happen, please pass them along. I’m assuming a few of you brave souls
will give this a go, and if you do, I’d love to hear about your experience. In
the meantime, I’m going to make an extra funky blue cheese butter to serve with
the leftovers, and pretend. Enjoy!
Ingredients:
1 Bone in Prime Rib (mine was 10 pounds, 8 1/4 after aging)
enough salt to season generously
For the salt wipe:
1/2 cup cold water
2 teaspoons kosher salt
- Roast at 500 F. for 20 minutes, then reduce to 300 F. (or
lower), and continue until you reach your desired doneness. I usually pull at
122-125 F. to get something close to a medium rare after resting.
These crispy “everything” flatbread crackers aren’t just
called “everything” because they’re inspired by the “everything bagel,” but also
because they’re everything you’d want in a flatbread. They’re savory, and
interesting enough to eat by themselves, but also pair perfectly with countless
dips, any cheese plate, and of course, anything you’d schmear on a bagel.
I played it safe with the powders, but I’m tempted to try
this with freshly minced garlic and onions, which would get us even closer to
their round inspiration. I’ll tweet a photo if it works, but even with the
dried stuff, it was really close. By the way, garlic/onion powder, and
granulated garlic/onion is the same thing, just ground to a different fineness,
and they’re interchangeable. Just make sure they’re made with pure garlic and
onion, and not a bunch of salt.
This easy technique will work with pretty much any seeds and
flavorings, so I encourage you to go nuts customizing the recipe. Just don’t
forget to flip your dough over before baking, so that your flatbread edges curl
up the right way. For a more rustic look, you can bake these uncut, and then
once cooled, snap them into irregular shards, which is also a great look.
Either way, I really hope you give these crispy “everything” flatbreads a try
soon. Enjoy!
Ingredients for about 48 Crispy “Everything” Flatbreads:
3/4 cup spouted spelt or whole wheat flour
3/4 cup all-purpose flour
1 teaspoon kosher salt (or 1/2 teaspoon fine salt)
1/2 teaspoon freshly ground black pepper
pinch cayenne
1/4 teaspoon garlic powder, or to taste
1/4 teaspoon onion powder, or to taste
1 tablespoon olive oil
1/2 cup hot water, or more as needed
poppy seeds and sesame seeds as needed
- Bake at 375F. for about 20 minutes, or until golden-brown
and crispy.
This spring vegetable tart only looks hard to make, and
would be a perfect centerpiece for any special occasion meal, just as long as
you put it out on the table a little bit early, since we’ll need to allow
enough time for all the Instagramming that follows. And please, no flash
photography.
As long as you use a wide array of colorful vegetables, and
tuck them into a gnarly base of greens, this easy cheese tart/salad can’t help
but look gorgeous. In fact, the hardest things will be deciding which
vegetables to use, and how to prepare them.
As I said in the video, you can go with anything from raw to
roasted, but my favorite way to prep the vegetables, is to simply blanch them
briefly in boiling, salted water. Just cook them for a few minutes to take off
the raw edge, and then plunge them into cold water, before draining, and
dressing.
Above and beyond the veggies, this cheese filling will work
with any soft cheese, but I think the tanginess of the goat cheese is an
important factor, so if you use something milder, you may want to sneak in some
lemon juice. Regardless, of what specific ingredients you use, I really hope
you give this gorgeous vegetable tart technique a try soon. Enjoy!
Ingredients for a 10-inch round Spring Vegetable Tart:
2 sheets frozen puff pastry (round or rectangular)
(This tart can be made with any type of shell, including
piecrust, phyllo, etc.)
1 large egg beaten with 1 teaspoon of water (for brushing,
and then for the filling)
For the filling:
1 1/4 cups goat cheese
salt, freshly ground black pepper, cayenne to taste
1/4 cup freshly chopped herbs, like dill, parsley, thyme,
tarragon, basil, chives, etc.
the rest of the egg wash
1/4 cup heavy cream
For the vegetables:
2 handfuls mixed colorful salad greens (including something
light and frizzy if possible)
2 to 3 cups of bite-sized fresh vegetables, briefly blanched
in salted water
1/2 cup thinly sliced raw radishes, and cherry tomatoes
For the dressing (this is what I used, but your favorite
salad dressing will work):
I’m running off to a very important meeting, and between
getting some notes together, and finding a clean shirt, I don’t have time to
write the bacon wrapped Spring chicken post just yet. So, for now you’ll have to settle for the ingredient
amounts, and I promise I’ll fill out the rest later. Enjoy!
Okay, I'm back, and ready to finish off this post. Except, I'm not sure exactly what to add, since the technique is every bit as easy as it appears in the video. The only real point of emphasis is keeping the knife relatively still where it goes into the side of the breast, as you cut a nice big pocket inside. Other than that, just be sure to tuck your bacon ends under the chicken, and you shouldn't have too much trouble. You should probably use a thermometer to check the doneness, but a great rule of thumb is when you see and hear juices from the stuffing and chicken start to leak into the pan. I just did a quick lemon deglaze, but time permitting, the browned bits in the pan will make a great pan sauce, like the one we did in this Airline Chicken video. Either way, I really hope you give this a try soon. Enjoy!
Ingredients for 2 portions:
For the stuffing:
2 tablespoons unsalted butter
1/2 cup sliced green onions (aka spring onions)
2 tablespoons finely diced jalapeno pepper
3 cloves minced garlic
1/2 teaspoon salt, plus more to taste
1/3 cup crumbled feta cheese, grated Gruyere, cheddar, blue, or any other
cheese
2 tablespoons freshly chopped green herbs (tarragon, parsley, dill, a little thyme, are all great choice alone or combined)
1/4 teaspoon freshly ground black pepper
pinch of cayenne pepper
1 rounded teaspoon fine dry breadcrumbs
For the rest:
2 eight-ounce boneless skinless chicken breast, cut as show
enough salt, freshly ground black pepper, cayenne to generously
season chicken
4 to 6 strips of bacon, or enough to wrap chicken breasts
1 teaspoon oil to grease pan
juice from 1 lemon to deglaze pan drippings
- Roast at 425 F. for about 30 minutes, or until an internal temp of at least 155 F.
I’ve wanted to do another “one-pan” pasta video, where we
cook everything right in the sauce, like we did in our famous Orecchiette with Sausage and Arugula recipe, but then I happened to see someone eating mac and
cheese on TV, and those plans changed.
I decided to adapt the same approach, and see what would
happen if I cooked the macaroni right in the milk, before making the cheese
sauce, and what happened was something just as creamy, cheesy, and delicious as
recipes using more traditional techniques. Besides loving the taste, and
texture, the whole procedure only took a few minutes longer than the boxed
stuff; not to mention we avoided about a dozen ingredients we probably
shouldn’t be eating.
This is a simple procedure, but there are a couple things to
keep in mind. Be sure to turn your heat off as soon as the cheese has melted,
or almost melted in. If you continue to cook the cheese it will separate and
get grainy. Also, please buy high-quality cheddar, and grate it yourself. Pre-grated
cheeses are of lower quality, and the shreds are coated in a cellulose power
that can give the final product an odd texture.
Thanks to being a little arrogant, and a lot delusional, I
assumed I had stumbled on to some new, game-changing recipe here, only to find
out that literally thousands of people had discovered this great trick way before
me. Which is fine, since deep down I know I could’ve invented it, but simply
didn’t need to. Regardless of who gets the credit, or which high-traffic
YouTube chef eventually claims to have invented it, the technique works quite well,
as so I really do hope you give it a try soon. Enjoy!
Ingredients for 2 portions:
2 cups whole milk
1 teaspoon kosher salt (1/2 teaspoon fine salt), plus more to
taste
pinch of cayenne
pinch of dried mustard, optional (I didn’t add, but many
people do)
very small pinch of nutmeg 1 tablespoon unsalted butter
1 cup small elbow macaroni
2 packed cups freshly grated cheddar cheese (about 6 to 8
ounce by weight)
For the panko topping:
1/2 cup panko breadcrumbs
2 tablespoons butter
- Cook crumbs in the butter over medium heat until golden
brown.
Sure this apple butter recipe takes many hours to cook, but
the recipe is quite easy (after you slice 5 pounds of apples), and once done,
you have what is basically a spreadable apple pie filling, only better. Buttered
toast sold separately. And, that’s just the beginning of what you can do with
this miraculous mixture.
It’s perfect used as a garnish for cheese plates, especially
alongside some nice sharp cheddar, or spread on some cheesy biscuits, which I
believe we posted a recipe for last year. Other approved uses include spreading
between the layers of a spice cake, filling seasonably appropriate thumbprint
cookies, or even as a condiment for pork chops. Sorry, apple sauce.
This is quite a simple procedure using a slow cooker as seen
herein, but if you don’t have one you can certainly do it on top of the stove
over low heat, as long as you use a nice thick-bottomed pot, and stir often.
Another option would be to place the mixture in a large roasting pan, and cook
it in a slow oven, stirring occasionally until dark and thick.
No matter what method used to cook this, your house will
smell amazing, as in they wish they could make scented candles that smell even
close to this good. So, for those reasons and more I really do hope you give
this a try soon. Enjoy!
Ingredients for about 4 cups of Apple Butter:
5 pounds Granny Smith, cored, sliced
1 1/2 cups white sugar
1/2 cup brown sugar
1/4 cup apple cider vinegar
1 teaspoon salt
2 teaspoon cinnamon
1/2 teaspoon allspice
1/8 teaspoon nutmeg splash of water, about 1/2 cup
I was watching golf the other day, and the announcer said
that great golfers don’t need lessons, they only need reminders, and I
immediately thought how well that saying applies to cooking. Well, this creamy chicken
toast recipe is both a lesson (aka recipe) and a reminder, and a comforting one
at that.
We’ll get to the recipe, but first, the reminder. Sometimes
even I forget just how simple it is to make a cream sauce by reducing heavy
cream. Almost every “cream sauce” you see is really milk thickened with some
type of starch, usually a roux. These sauces are easy, and delicious, and we’ve
made hundreds of them, but once in a while it’s nice to have the thing those
concoctions are meant to mimic.
If you’re worried this might be too rich for you, keep in
mind that by the time we add all the buttery roux to a milk-based sauce, we’re
getting pretty close to the fat content of this. So, why not just do this with
cream all the time? Cream is way more expensive than milk, and that’s before we
reduce it. How much more? You know the old saying…if you have to ask, use milk.
As far as the recipe goes, I loved how this came out, but it
begs for adaptation, especially when it comes to which diced veggies to toss
in. Just be sure you cooked whatever you're using before you add the cream, since
once that reduces, your dish is done, still crunchy vegetables, or not. Besides
that, not much can go wrong, and a lot can go right, so I really do hope you
give this a try soon. Enjoy!
Welcome to another episode of food you only see in
restaurants, starring the always eye-catching “airline chicken” breast. Legend
has it that the name comes from the fact this cut of chicken is shaped like an
airplane wing, but that’s not actually the reason.
This beautiful breast is
known as airline chicken because it was such a popular menu item back in the
day, when airlines still gave their guests real food. Above and beyond the wing-like shape, this worked so well is
because food for air travel needs to be cooked way ahead of time, which means
it can dry out, especially something like a chicken breast, but by leaving the
wing joint attached, that becomes a little less likely. Plus, once you finished
your breast, you got to eat a chicken wing drumette. Now that’s value-added
service.
As I mentioned in the video, please feel free to use whatever
spices and seasoning you wish, since that will not affect the technique at all.
I should have used fresh herbs inside for a little nicer appearance once sliced,
but I think I more than made up for that with the sprig of rosemary. Regardless
of how you flavor yours, I really do hope you give this a try soon. Enjoy!
Even though I only do it once every few years or so, making
salmon gravlax at home is a fun weekend project, and with very little effort,
you can produce some very impressive results. I’ve always done this with the
traditional fresh dill sprigs, but after enjoying a beet-stained version at
Plaj, I decided to try my hand. And, also stain my hand.
If you’re just doing a small tail piece like I did, these
times and measurements should get you close to what you see here, but if you're feeling adventurous, and want to do something larger, then you may have to do
some research for techniques that work better when doing a thicker piece of
fish.
Those slightly more complicated methods involve turning,
draining, and basting, to account for a longer curing time.So what I’m trying to say is, you can avoid
all that by just doing a smaller piece, which, unless you’re hosting a large
party, should be plenty. Speaking of large parties, and the litigious people
that sometime attend them, please be sure to get your salmon from a reliable
source.
I think a brick works great for a press, but anything that
weighs a few pounds would be fine, as long as it’s large, and flat enough to
distribute the weight evenly. A book with a few cans of soup on it would do the
trick. Regardless of how you press yours, once unwrapped, sliced, and served on
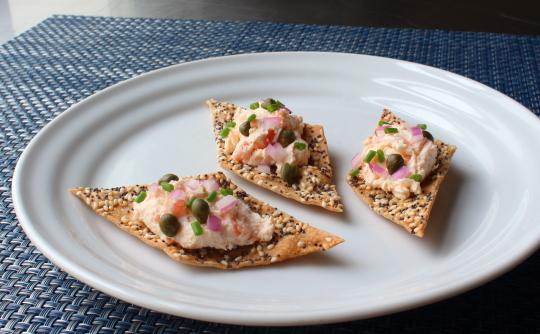
a toasted bagel, I think you’ll agree it was worth the wait. So, I really do
hope you give this gravlax technique a try soon. Enjoy!
Ingredients for 6 to 10 ounces of Gravlax:
8 to 12 ounce tail section of fresh salmon with skin on
(scaled)
1/4 cup kosher salt
1/4 cup white sugar
cayenne and/or freshly ground black pepper to taste
enough grated beet and/or fresh dill springs to thickly
cover fish
- Press with something heavy, and let cure in fridge for 1 1/2 days, or until salmon is firm, and translucent when sliced. You can
carefully unwrap, and poke to test, and then rewrap, and let cure longer if
need be.
Ever since I saw Alton Brown grilling skirt steak on hot coals, I’ve wanted to try this technique for a larger hunk
of meat, but it was the realization that no one had yet called a recipe
“barbarian beef,” that provided the final push.
By the way, I did no historical
research, but I assume your average barbarian was too busy pillaging to lug a
grill around, and just cooked their meat right on the coals. So, for the purposes of this post, that's the story we'll be going with.
I used top round for this, and if
you’re just going to slice it thin, and make sandwiches it’s fine, but now that
I have a little experience, I’d like to try it with a tenderer cut. No matter
what you use, you’ll want to take it off a few degrees under whatever your
regular internal temp target is, since it definitely continues to cook after
you take it off the coals.
It’ll depend on the size/shape of your
cut, but use a thermometer to check, as the temp will probably climb by at
least 10 degrees. Above and beyond doneness, the flavor of the beef really was
great. Very similar to something off a grill, but with a little bit deeper
level of smokiness. Even if you don’t cook your steak on the coals, the sauce
was quite nice, and comes highly recommended, but officially, I really do hope
you give both a try soon. Enjoy!
This seafood sausage recipe is one of those dishes you learn
in culinary school, and then never make in a restaurant, the rest of your
career. Unlike your more common meat-based sausages, which are made from
assorted scraps, and you really don’t want to know, these seafood sausages need
pristine product to shine, thereby eliminating the money-saving incentive of
making sausage.
However, despite their lack of popularity, these really are a
great way to take less than thrilling seafood, like some sleepy sole, and
previously frozen salmon, and make something that seems far more special. The
flavor is lovely, and the texture is similar to a boudin blanc, or white hot
dog, if you prefer.
If you want something with a courser texture, simply make
the sausage mixture as shown, but then fold in a few handfuls of chopped
shrimp, scallop, or any other seafood. Once cooked, and sliced, you’ll see
pieces of whatever you added studding the link. I actually prefer the smooth
style, but it’s fun to experiment. Either way, I really do hope you give these
a try soon. Enjoy!
Ingredients for 4 Seafood Sausages:
8 ounces boneless, skinless sole or other white fish
4 ounces boneless, skinless salmon
4 ounces peeled, deveined shrimp
2 tablespoons plain dry breadcrumbs
4 large egg whites
1 large whole egg
2 teaspoons kosher salt (or maybe 1 1/4 teaspoon fine salt)
Even though they only require a few of ingredients, and the
technique to make them only takes a few seconds to learn, homemade corn
tortillas do take a fair amount of experience to master, because of all the
variables. But, don’t let that stop you from trying, since the results, even as
produced by a novice, are vastly superior to ones from the grocery store.
They’re also significantly cheaper, but the “vastly superior” part is more than
enough reason.
That’s because a bag of Maseca, which is the most commonly
found brand of masa flour in U.S. grocery stores, and the one I used, is very
inexpensive, and will make hundreds of tortillas. So, the instant corn masa
flour isn’t a variable, but pretty much everything else is. From the amount of
water, to how much salt, to how hot a pan to use, to how long to cook them;
everyone seems to have a little bit different system.
When it comes to the water, you’ll know you have the right
amount, if your tortillas press out to a nice round, relatively smooth-edged
shape. If the outside edge of the tortilla has cracks once pressed, then you
need more water. On the other hand, if the tortilla sticks to your fingers, or
breaks apart getting it off the plastic, then it was too wet. Adjust
accordingly. And like I said, give yourself a few years to experiment.
As far as the pan, I go with a cast-iron skillet, which I
get nice and hot over high heat, and then I’ll back it down to about medium
while I cook my tortillas. I also tend to cook mine a little longer in the pan
than is traditional, but I enjoy that nice, lightly-toasted corn flavor you get
when a little bit of browning occurs. A few extra seconds in the pan is fine,
as long as they are stacked, and wrapped in the towel, which is probably the
most important step in the entire operation.
In fact, eat one of these right from the pan, and then
compare it to one that you’ve let steam together with the rest of the tortillas
in the towel. You’ll be truly amazed at the difference. So, if you enjoy
store-bought corn tortillas, but always wondered what the real stuff was like,
I hope you give these a try soon. Enjoy!
After posting the long, and relatively complicated
croissants video last week, I decided to take a little mental break, and do a
video for how to put together a holiday cheese board. I’ve wanted to do this
one for a while, and since we’re in the middle of entertaining season, I
thought the timing was perfect.
It’s always stressful to have people coming over this time
of the year. You want to please, and impress, but there never seems to be
enough time to get everything done, especially in the kitchen, and that’s when
a well-designed cheese board can save the day.
They’re fast to put together, and you don’t need any special
skills, other than being able to talk to strangers at the fancy grocery store.
Most feature extensive cheese selections, and it’s been my experience that the
people who work in those departments love helping you pick out your
cheese.
I know this, since I’m married to one of those people.
Michele used to sell cheese in various shops and charcuteries, and her
selection/pairing skills are legendary. Customers would simply tell her how
many guests were coming, as well as what was being served, in particular, which
adult beverages, and she would work her magic.
I gave you our basic approach for composing one of these boards,
but there are many different ways you can go, so I encourage you to find the
“Michele” at whichever place you’re buying your cheese. You won’t regret it. No
matter which cheeses you end up with, or how you garnish them, I really hope
you give this a try soon. Enjoy!
Ingredients:
Le Mothais sur Feuille - Goat Cheese Prunes Fuyu Persimmons Bread - Rye Krisp Knife - Combo (spread, slice, stab)
Manchego
Membrillo - Sheep Cheese Quince paste Bread - water crackers Knife - slice and stab (knife with holes)