And, as always, enjoy! If you want more information about why the blog format has changed, and why we're now offering complete written recipes, please read all about that here.
And, as always, enjoy! If you want more information about why the blog format has changed, and why we're now offering complete written recipes, please read all about that here.
And, as always, enjoy! If you want more information about why the blog format has changed, and why we're now offering complete written recipes, please read all about that here.
Who Bob was, or how I knew him, or whether he even really existed isn’t the point here. What matters is how amazing this “kofta” style kabob, or kebab if you prefer, really is. These use ground meat instead of the more common cubes, which not only looks super cool on the skewers, but also allows us to ... to read the rest of Chef John's article about this Bob’s Kabobs,please follow this link to become a member.) Follow this link to get a complete, printable written recipe for Bob’s Kabobs!
And, as always, enjoy! If you want more information about why the blog format has changed, and why we're now offering complete written recipes, please read all about that here.
Don’t let the fancy sounding name fool you, this delicious lamb scallopini recipe is simple, fast, and very easy to make. Lamb is traditionally served on Easter, but with social distancing, this scaled-down approach may work better than something like a large roasted leg of lamb, which is more fitting for a big group. We’ll do one of those... to read the rest of Chef John's article about this Lamb Scallopini recipe,please follow this link to become a member.) Follow this link to get a complete, printable written recipe for Lamb Scallopini!
And, as always, enjoy! If you want more information about why the blog format has changed, and why we're now offering complete written recipes, please read all about that here.
And, as always, enjoy! If you want more information about why the blog format has changed, and why we're now offering complete written recipes, please read all about that here.
While our homemade butcher’s nuggets won’t feature the same
diversity of meat parts as the butcher shop, at least they won’t feature the
same diversity of meat parts. Seriously, those folks will put anything into a
sausage or meatball. All kidding aside, these crispy fried meatballs will have
you wondering why non-chicken nuggets aren’t more popular.
I went with a fairly restrained combo of just beef and lamb,
but that doesn’t mean you can’t be a little more adventurous. Using pork is an
obvious choice, and as I mentioned in the video, I think chicken livers would
be amazing in this. Above and beyond the meat choices, you also have lots of
artistic freedom when it comes to the shape, and what dipping sauce you pair
them with.
At Fern Bar in Sebastopol, where I stole the idea, they’ll
switch up the ingredients depending on what’s around, as well as change the
sauce underneath, although it’s almost always something a little bit on the
sweet side. Of course, our “secret sauce” (shhhhhh) goes with everything, but
deciding how to tweak that to match your meats is half the fun. The rest of the
fun is eating these butcher’s nuggets, and lots of them, which I hope you do very
soon. Enjoy!
Ingredients for 18 to 20 Butcher’s Nuggets:
Note: the scoop I used to portion holds about 1 1/2
tablespoons of mixture.
For the nuggets:
3 tablespoons panko breadcrumbs
1 1/2 teaspoons kosher salt
1 teaspoon freshly ground black pepper
cayenne to taste
1 teaspoon finely minced rosemary
1 clove crushed garlic
1/4 cup milk
dash of Worcestershire sauce
1/2 pound ground lamb
1/2 pound ground beef
For the breading (amounts as needed):
all-purpose flour
beaten eggs (I used 2 large eggs)
panko breadcrumbs
For the secret sauce:
1/4 cup mayo
1/4 cup mustard
1/4 cup ketchup
1/2 teaspoon ground chipotle
- Fry nuggets at 375 F. for about 3 minutes, then let rest 3
minutes before serving.
Lamb borek is stunning to look at, and even more enjoyable
to eat, which is all thanks to, believe it or not, intentionally soggy dough.
This is something I didn’t grasp the first time I made it, and I just brushed melted
butter between the layers, hoping for something really crispy, and flaky, which
in Phylloland is standard operating procedure. However, since my dough was not
made flexible by the egg/yogurt/butter wash we used here, it basically exploded in like seven
spots when I tried to roll it up. Lesson learned.
Besides moisturizing the phyllo, this magic mixture also
adds flavor, thanks to the tangy yogurt; and the melted butter helps create a
fairly crispy exterior as well. So, while we don’t want to fully saturate the
sheets, a light brushing really does wonders. If you use a 9 or 10 inch round
pan like I did, three rolls should work out nicely, but this technique will
work no matter what you bake it on. You can also skip the spiral effect, and
keep them straight, or bend them into any other shape.
You’ll need a package of phyllo that provides at least 12 decent
sheets, and I really hope yours is better than the tragic box I bought.
However, as bad as mine was, it still worked out quite nicely, so I’m not exactly
sure why I’m complaining. Anyway, whether you make the recipe as listed, or
tweak the filling to your tastes, I really do hope you give this lamb borek
recipe a try soon. Enjoy!
Ingredients for 6 large portions:
(for one 9-10 inch round baking dish)
1 package frozen phyllo (filo) dough
2 teaspoons sesame seeds for the top, optional
For the lamb filling (you’ll have some leftover):
2 tablespoons olive oil
1 large onion, diced
2 pounds ground lamb
2 teaspoons salt, plus more to taste
4 cloves minced garlic
2 tablespoons currants
3 tablespoons toasted pine nuts
2 teaspoons ground cumin
1 teaspoon ground coriander
1 teaspoon cinnamon
1 teaspoon paprika
1 teaspoon freshly ground black pepper
1/2 teaspoon cayenne
1/4 teaspoon allspice
1 1/2 cups tomato sauce
1/4 cup water
For the egg/yogurt/butter wash:
1 large egg
3 tablespoons Greek yogurt
2 tablespoons water
2 tablespoon melted butter
For the yogurt sauce:
1/2 cup plain Greek yogurt
2 tablespoons very finely sliced mint leaves
lemon juice to taste
1 crushed garlic clove, optional
enough water to achieve desired texture
pinch of salt and cayenne
- Bake at 400 F. for 35-40 minutes, or until browned and
crisp.
Note: Save any extra phyllo, since the filling recipe above makes
extra, and you can fold up some smaller, triangular boreks if you want.
“Karniyarik” means “split belly,” which refers to the
technique used to stuff them, although depending on the size of your eggplant,
it could also refer to you after enjoying this delicious dish. By the way, this
was my first time making these, and when I mentioned in the video only doing 15
minutes of research before filming, I wasn’t joking. So, you’ve been warned.
Having said that, I thought these came out really well, and
I would only tweak a couple minor things next time. I’d sprinkle the insides
with salt before stuffing, since there wasn’t enough in my filling to season
them to my taste. I’d also toss in some chopped parsley, which would have added a
little freshness to the dish, although the dried rosemary did work nicely.
Lastly, I’d take the advice I got on Twitter, and serve
them with a yogurt sauce, like our famous tzatziki. That would be an amazing
condiment for these, since the cold, acidic sauce would be a perfect foil for the
rich, aromatic, slightly sweet flavor profile.
Since I’m fully
admitting not knowing what I’m doing, I welcome any and all tips and tricks,
but most of all, I really do hope you give these a try. Enjoy!
Ingredients for 4 Turkish Stuffed Eggplant (Karniyarik:
4 medium sized eggplant
olive oil as needed
1 yellow onion, diced
1 teaspoon kosher salt, plus more to taste
4 cloves garlic, crushed
1 teaspoon freshly ground black pepper
1 teaspoon ground cumin
1/2 teaspoon cinnamon
1/4 teaspoon cayenne
1/2 teaspoon dried rosemary
1/4 cup freshly chopped Italian parsley (I didn’t add, but
you should)
2 tablespoons tomato paste
1 pound ground lamb or beef 1 1/2 cups diced sweet and/or hot peppers
1 ounce (about 1 cup unpacked) finely, freshly grated
Pecorino cheese, or whatever you’re into
1 cup chicken broth
- Roast eggplant at 400 F. until just barely soft, stuff,
and continue baking until very tender.
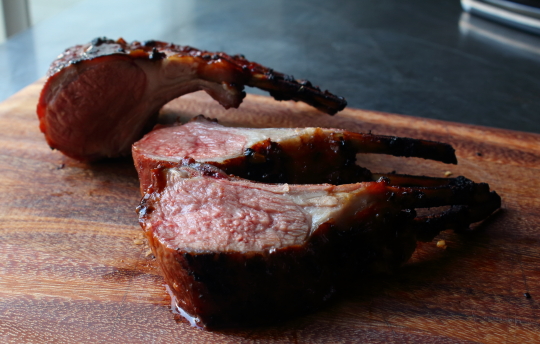
While less popular than beef and pork,
lamb was the original barbecued meat (Google barbacoa for details), and may be the best suited for cooking over smoky coals. That’s especially true when
paired with this very simple Korean-inspired marinade. This really did taste
every bit as good as it looked, and that’s saying something.
Lamb has a slight, subtly sweet
gaminess, which works perfectly with the funky goodness of our gochujang
chili paste, and if you let it soak overnight, you’ll be rewarded with a juicy
interior as well. I love using rack for this, since it’s more tender, and easier
to work with than leg, and a little more user friendly than chops.
You should find gochujang at any grocery store where the
cool kids shop, but if not, it’s available online. Here is the one I used, just
in case that matters. If you do happen to splurge for a jar, trust me, you’ll
use it all by the end of summer.
By the way, the ingredient amounts below will only allow for
a few tablespoons of sauce, once reduced. If you want more, just double the amounts,
and save half to add to your reduction. A little more sauce probably isn’t a
bad idea, especially if there’s going to be rice around. Either way, I really
do hope you give this a try soon. Enjoy!
There are so many things this pastrami inspired rub would
work wonderfully with, but these lamb top sirloins have to be right near the
top of the list. The subtle gaminess of the meat works perfectly with the
aromatic spices, which once activated by the heat and smoke of the grill,
really create something fairly pastrami-like; just as long as you “overcook”
it. Don’t worry, those quote marks are there for a reason.
By “overcook,” I simply mean longer than we would normally
grill a relatively tender cut of lamb. While this would be perfectly
fine cooked to a rosy-pink interior, I want to go just past medium for this
particular recipe, since not only do I want a pastrami-like flavor profile, I
also wanted it to have a firmer texture, and to be able to absorb the maximum
amount of smoke.
And yes, I know, we could’ve actually smoked it, but that’s
not this video. Anyway, by pulling the meat off at about 140 F. internal temp,
with the carryover heat, you’ll still have beautifully moist, tender meat, but
won’t have any of that chewiness you sometimes get with rare or medium rare
lamb. Of course, suit yourself, but that’s the official recommendation from
someone who loves medium-rare meat.
Even if you don’t end up using the same spice rub, I hope at
the very least you’ll consider lamb top sirloin the next time you’re looking
for something easy, and a little bit different for the grill. It generally
comes fully trimmed, and ready to grill, not to mention at a relatively
reasonable price compared to lamb chops. So, whether you’re looking for
something a little different for your Easter dinner, or upcoming cookout, I
really do hope you give this a try soon. Enjoy!
Ingredients for 2 portions:
2 lamb top sirloins (about 8 ounces each)
For the wet rub:
2 tablespoons freshly ground black pepper
2 tablespoons ground coriander
1 tablespoon kosher salt (about 2 teaspoons table salt)
1 teaspoon paprika
1/4 teaspoon cayenne
2-3 tablespoons olive oil, or enough to make a paste
We’re in one of those in between times of the year, when you
start to see Spring ingredients and recipes, which are always a welcomed sight,
yet the weather may still be cold and dreary, which is why these beer-braised
lamb shanks work so well.
Lamb is a classic springtime meat, and by using the shanks,
we not only get a great seasonal meal, but an extremely comforting one at that.
Of all the cuts, the shank has the most connective tissue, and as long as you
cook it enough, you’ll be rewarded with tender, succulent meat that warms you
from the inside out.
However, if you don’t braise it long enough, the meat will
be tough, rubbery, and borderline inedible, which means you’ll have to get
online, and give that recipe a terrible review for not working. Okay, just
kidding. What you really want to do is not stop cooking until it’s completely
tender. Above and beyond how long to braise, try to use a deep pan that’s just
large enough to fit however many shanks you’re doing in a single layer. A
tight-fitting lid is also highly recommended.
As far as the beer goes, I used a cheap, unremarkable lager, which came in a
24-ounce can (which explains the measuring cup), and it worked wonderfully. If
you’re feeling experimental, something like an amber ale would also be great, as
would a fruity sour (which would make it a lamb-bic). The only thing I’d avoid would be
something that’s super hoppy, as the bitterness may overwhelm the other
flavors. Regardless of what beer you decide to use, I really do hope you get
this a try soon. Enjoy!
Ingredients for 2 Portions:
2 lamb shanks (ask butcher for the smaller fore shanks)
If you’re from Greece, you’re probably pretty confused right
now, and wondering why I’m calling this gyros. There, pork and chicken are
used, in non-ground form, and as the meat turns slowly over a fire, the cooked,
caramelized surface is shaved off into thin slices.
It’s amazing stuff, but
believe it or not, I prefer this Americanized “mystery meat” approach, which
uses ground lamb and/or beef. The spices are similar, but the texture is totally
different, and for me, more interesting. I can eat fresh, identifiable meat
anytime, so when I’m in the mood for gyros, I want the stuff you can only get
from certain street vendors. Of course, since the meat is ground, you’re taking
their word for which specific animals made the ultimate sacrifice, which is why
this stuff became affectionately known as “mystery meat.”
This style is perfect for making ahead of time. Once it’s
chilled, and sliced, all you need to do is brown it in a pan, and find some
flatbread to roll it up in. Preferably, that would be homemade Lebanese
mountain bread, which I will attempt to show you in the near future. In the
meantime, your favorite pita will do, just as long as you don’t forget to make
some tzatziki. I really hope you give this a
try soon. Enjoy!
Ingredients for 8 portions:
1 pound ground lamb
1 pound ground beef
1/2 cup finely diced yellow onion
4 cloves garlic, crushed
1 tablespoon freshly minced rosemary
2 teaspoons dried oregano
2 to 3 teaspoons kosher salt, or to taste (you can cook a
small piece to test)
1 teaspoon fresh ground black pepper
1 teaspoon cumin
1 teaspoon paprika
1/8 teaspoon cinnamon
1/8 teaspoon cayenne pepper
2 tablespoons bread crumb
- Cook at 350 F. for 45 minutes, or until an internal temp
of 160 F. -- Note: to make the pickled red onions, simply slice them about 1/8-inch thick, and cover with red wine vinegar for a few hours, or overnight. They will turn into the beautifully colored garnish seen herein.
Like many Americans my age, I was raised with a jar of mint
jelly in the fridge, and it never, ever, came out unless there was lamb around.
In fact, if someone caught you making a PB&J with mint jelly back then, it
was straight to the insane asylum. Nope, mint jelly was to be
served only with lamb – and lamb only with mint jelly.
We’ve come a long way since then, and now, anything goes.
Except for peanut butter and mint jelly sandwiches. That’s still considered crazy.
But as far as mint sauces go, I love experimenting with new ideas, especially
around Easter time, and I really liked how this came out.
As I mention, next time we’ll add our mint right before we
serve, so to preserve that bright green color, but besides that, I really
enjoyed the combination. Once it was properly seasoned, that is. I added more of
everything; lemon juice, salt, cayenne, and mint, before it was just right. The
ingredient amounts below have been properly adjusted.
Regarding the cooking method: I usually sear my racks in a
very hot frying pan, then add the mustard/crumb mixture, and roast until we reach
125 F., internal temp. This time I tried an alternative method, where you sear it in a hot oven, then add the crumbs, and continue roasting
until done. Which is a better method for the home cook? Probably the first one.
The good news is; if you watch any of our older rack of lamb
videos, you see this method in all its glory. In fact, this “Pistachio Crusted Rack of Lamb” would not only show you our preferred technique, but would also
go amazingly well with this sauce. I really hope you give it a try soon. Enjoy!
Ingredients for 2 large or 4 smaller portions:
1 whole (8 bone) rack of lamb seasoned very generously with
salt, freshly ground black pepper, and cayenne
2 tablespoons Dijon mustard
1 tablespoons finely minced green onions
1/4 cup fine plain bread crumbs
2 tablespoons melted butter
1/4 teaspoon salt
For the *sauce:
2 cups fresh strawberries
zest of one lemon
juice from 2 lemons
1/4 cup water
2 tablespoons honey
1/4 cup freshly sliced mint leaves (add right before you
serve!)
salt and cayenne pepper to taste
* Only do final seasoning when the sauce has cooled. When
tasting the sauce, keep in mind it’s going to be used as a condiment, and not
eaten plain, which means it needs to be very well-seasoned. This is why it’s
better to taste on a cracker or piece of bread, instead of off the spoon. Other
great additions to this sauce are things like balsamic vinegar, hot/sweet
peppers, cracked black pepper, as well as other “sweet” herbs, like tarragon
and basil.
You could roast an expensive leg of lamb for Easter, which
would be lovely, but why not consider the lesser known, and just as delicious shoulder
roast? This underrated cut is less expensive, very flavorful, and much less
stressful.
We usually prepare the leg medium-rare to medium for maximum
enjoyment, which requires a little more finesse than a shoulder roast, which we’re
going to cook long and slow, until very tender. As long as you let the meat braise until it's falling off the bone, there's no way this isn't going to be great.
Obviously, we’re talking about a completely different
texture than roasted lamb, but if you like things like shredded beef, and
pulled pork, you will be down with this. As I mentioned in the video, I wanted
you to focus on the super easy technique, and not necessarily the ingredients I
used.
Honey, vinegar, and mint are classic with lamb, but any
other sweet/sour approach should work nicely. You could even cheat, and use your
favorite barbecue sauce (you know my favorite), which would be perfect
with this rich, succulent cut, as well. I hope you give this a try soon. Enjoy!
Ingredients for 4 large portions (about 3 sliders per
person):
1 tablespoon vegetable oil
3 1/2 pound bone-in lamb shoulder roast
salt and freshly ground black pepper 1 onion, cut in large dice 4 cloves garlic, minced
1 cup chicken broth
1/2 cup cider vinegar
1/4 cup honey
1/4 teaspoon red pepper flakes
2 tablespoons freshly sliced mint
- 325 F. for 2 1/2 to 3 hours, or until very tender
I had a fantastic appetizer recently featuring lamb belly, radishes,
anchovies, and mint, which inspired today’s post. It sounded amazing, but I’d
only glanced at the description, so when it came, I was more than a little surprised
to see the radishes were fully cooked.
This was a new one for me, and I absolutely loved it. Like
most root vegetables, radishes don’t have a ton of flavor, but I found them
slightly sweet, earthy (duh), and aromatic. Plus, they seemed to have effectively absorbed
all the other flavors in the dish.
One thing led to another, and I adapted the approach to
create one of the more interesting and delicious things I’ve had in a while. I
called it a “flavor bomb” in the video, but “umami bomb” would be more
accurate. This was as savory, as savory gets.
Because of all the sweet flavors going on, I decided not to add
any sauteed onions or garlic, which is contrary to most braised meat recipes. It
probably wouldn’t have hurt anything, and I might try it next time, but to be
honest, this came out so perfectly balanced, that I’m a little scared to change
anything.
And no, you can't taste the anchovies. That doesn't mean you should tell anyone they're in there, but I did want to mention, in case you're scared. I would like to thank Aatxe for the inspiration, and I
really hope you give this strange, but exciting braised lamb dish and try soon.
Enjoy!
Makes 4 Portions:
4lamb shoulder chops
(10-12 ounces each)
1 tablespoon kosher salt (or about 2 tsp of table salt)
1 teaspoon blackpepper
1 teaspoon paprika
1/4 tsp cayenne
1 tbsp olive oil
1/3 cup sherry vinegar
2 tablespoons sugar
4 oil-packed anchovy fillets
1 1/2 cups low-sodium or no sodium chicken broth (the anchovies
and spice rub on the lamb usually provide enough salt, plus you can add at the
end after sauce is reduced)
1/4 tsp cinnamon
2 bunches breakfast radishes, trimmed
2 tsp minced fresh rosemary 5 or 6 fresh mint leaves finely sliced
1 tbsp cold butter
- Braise at 275 F. for about 3 hour , or until meat is just
barely tender, then finish at 425 F. to brown. Serve with de-fatted and reduced
sauce.
There’s no getting around the fact that these lamb and rice
stuffed grape leaves, aka “dolmas,” take some time and effort to put together,
but at least they’ll all be gone in just a few minutes. What I’m trying to say
is, maybe make a double batch.
If you order these at your favorite Mediterranean restaurant,
you’ve probably enjoyed the more common meatless version, but I really do love
the lamb in these. The technique works the same no matter what you use, but of
course, how much rice you use will affect how much liquid you need.
As far as the grape leaves go, I’ve only done these with the
ones in the jar, which work great for me. I’ve heard these are even better with
fresh grape leaves, but where the heck am I going to get my hands on those in
Northern California?
As I mentioned in the video, these are wonderful at any
temperature, which makes them a great option for parties. You can put them out
warm, knowing that they’ll be just as delicious when they are cold. I garnished
mine very simply with lemon and olive oil, but any cold yogurt sauce makes for
a beautiful dip. I really hope you give these a try soon. Enjoy!
Ingredients for about 32 Lamb & Rice Stuffed Grape
Leaves:
1/2 pound ground lamb
rounded 1/2 cup long grain rice
1/4 cup olive oil, plus more for drizzling
1 tablespoon currants
1 tablespoon pine nuts
1 1/2 teaspoons kosher salt
1 teaspoon ground black pepper
1/2 teaspoon ground cumin
1/4 teaspoon ground cinnamon
1/4 teaspoon dry oregano
2 tablespoons chopped mint 1 large egg
1 jar (16-oz) grape leaves, drained and rinsed
To cook the “Dolmas:”
4 cups chicken broth (tip: use already hot to save time)
Juice of one lemon
drizzle of olive oil
- Simmer, covered, gently for about 45 minutes or until rice
is tender. I usually check at around 35 minutes, and play it by ear from there.


 “Karniyarik” means “split belly,” which refers to the
technique used to stuff them, although depending on the size of your eggplant,
it could also refer to you after enjoying this delicious dish. By the way, this
was my first time making these, and when I mentioned in the video only doing 15
minutes of research before filming, I wasn’t joking. So, you’ve been warned.
“Karniyarik” means “split belly,” which refers to the
technique used to stuff them, although depending on the size of your eggplant,
it could also refer to you after enjoying this delicious dish. By the way, this
was my first time making these, and when I mentioned in the video only doing 15
minutes of research before filming, I wasn’t joking. So, you’ve been warned.