Showing posts with label Salads. Show all posts

Friday, September 6, 2019

Bloody Mary Burrata – An Experiment in Liquefying Salads

I don’t think there’s actually a difference between a liquid salad, and a cold vegetable soup, but if there is, I’d like this Bloody Mary Burrata recipe to be considered the former. Especially since I already posted a gazpacho this summer. But regardless of what you call this strange hybrid, it really was delicious, fun to eat, and very refreshing.

I was recently gifted some homemade Bloody Mary mix by a couple of new friends, Clayton and Linda-Marie, which unfortunately I haven’t been able to enjoy yet. However, the combination of seeing that on the counter, along with a tub of burrata cheese in the fridge, led to this rather odd attempt. While the Bloody Mary part of the equation completely dominated the tomato and mozzarella salad element, I still found this thoroughly enjoyable to eat, which at the end of the day, is all that matters.

I’m not exactly sure how best to serve this, but a small portion as a starter would seem to make the most sense. Or, maybe a larger serving, paired with a crusty hunk of bread as a brunch item. Vodka sold separately. So, whether you’re going to take this idea and run with it, or you’re just going to do the first part, and make some real Bloody Marys, I hope you give this a try soon. Enjoy!


Ingredients for 4 portions of Blood Mary Burrata:
2 pounds fresh vine-ripened tomatoes
1/3 cup sliced celery
1/4 cup sliced hot or mild red peppers
1/2 clove garlic
1/2 cup water
juice of one lemon
2 tablespoons Worcestershire sauce, or to taste
2 teaspoon hot sauce, or to taste
2 tablespoons hot prepared horseradish, or to taste
2 teaspoon black pepper, or to taste
1 teaspoon kosher salt, or to taste

For Service:
1 cup Blood Mary Burrata base
2 ounces burrata cheese, or fresh mozzarella
sliced olives, celery, and cherry tomatoes to garnish
freshly grated horseradish root for the top
freshly ground black pepper and olive oil to finish, optional
-->

Tuesday, August 6, 2019

Confetti Rice Salad – Celebrating Your Improved Knife Skills

If you don’t do a lot of cooking, this confetti rice salad recipe might be the kind of thing you disregard, since it probably appears to require lots of slicing and dicing, which is true, but that’s a bad reason to not make it. That would be like not using real confetti for your celebration because it’s hard to clean up.

The truth of the matter is, with very little practice, all the veggies for this salad can probably be prepped in less than 15 minutes. In fact, this would be a great recipe to set your benchmark, and then see how you improve over time. Or, just use a food processor to chop everything. Either way, it’s worth the effort.

Obviously, you can adapt this recipe a thousand different ways, and I’m not just talking about which vegetables you toss in. If you want something creamier, you can add some mayo, or sour cream, or any combination of both. If you do, I’d cut back on the oil and vinegar a bit, but either way, make sure you hold back some of whatever you’re dressing this with.

Any dressing you add before it goes in the fridge will be full absorbed, and I think the texture is much nicer if we moisten the salad with more before service. That’s up to you also, but we don’t want our confetti rice as dry as the real stuff. Other than that, not much can go wrong, and I really do hope you give this a try soon. Enjoy!


Ingredients for 12 portions:
2 cups white long grain rice
1 teaspoon kosher salt
2 tablespoons olive oil
3 cups boiling water
- Place in 9 x 12 baking dish, cover, and cook rice for 35 minutes, then let rest 10 minutes, before fluffing.
1/2 cup green peas
1/2 cup sliced blanched green beans
1/2 cup finely diced blanched carrots
2 large red bell pepper, finely diced
1 large orange bell pepper, finely diced
1/4 cup sliced green onions
1/4 cup red onions
2 teaspoons kosher salt, plus more to taste
cayenne to taste
3/4 cup sherry and/or rice vinegar (add 1/2 cup before fridge, and 1/4 cup after)
3/4 cup olive oil (add 1/2 cup before fridge, and 1/4 cup after)
1/4 cup freshly chopped dill
1/4 cup freshly chopped Italian parsley
-->

Tuesday, June 18, 2019

Chicken Noodle Salad – Making Friends with Cold Spaghetti

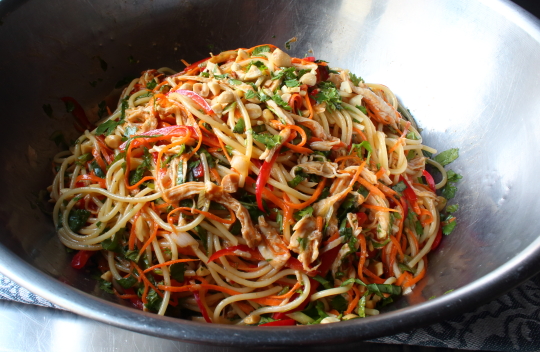
The great American philosopher, Homer Simpson, once said, “You don’t make friends with salad.” This cold, spicy, and addictively delicious chicken noodle salad might be the exception. You bring a big bowl of this to the next big cookout, and you’re going to make all sorts of friends. The only people who might not be huge fans are the folks who brought regular pasta salads, in which case the best you can hope for is frenemies.

While I also love more traditional pasta salads, there’s just something extra special about this combination of tastes, and textures, as well as the always exciting aspect of spicy food served cold. Besides that, this recipe is a perfect catchall for all those summer vegetables we're supposed to be eating more of. No matter what you add, if you can make this ahead, it will always come out a little better, since the noodles and chicken will have time to soak up all that flavorful dressing.

As I mentioned, this salad usually gets made because you have some possibly dry leftover grilled chicken around, or other meat for that matter, but if you do want to poach some like I did here, I would watch this video for the proper technique. Or, in a pinch, just pick up a rotisserie chicken from the store. Regardless of what you use, I really do hope you give this a try soon. Enjoy!


Ingredients for 4 large portions:
8 ounces dry spaghetti, cooked al dente, rinsed in cold water, and drained
1 large cooked chicken breast, shredded
1 cup thinly grated carrots
1 red bell pepper, thinly sliced
4 green onions, thinly sliced
1/2 cup chopped roasted salted peanuts
1 cup packed mixture of chopped basil, mint, and cilantro

For the dressing (all amounts here are to taste, so add more if you want): 
3 garlic cloves, crushed 
1/2 cup seasoned rice vinegar 
1 tablespoon brown sugar 
1 tablespoon soy sauce 
1 tablespoon fish sauce 
1 tablespoon sriracha 
1 tablespoon hoisin 
1 teaspoon sesame oil
-->

Wednesday, May 29, 2019

Sweet Hot Mustard Slaw – It’s All About the “Cassage”

I’m not particularly picky about my coleslaws, and as long as they’re properly made, I enjoy a wide variety of flavors and combinations, but this mustard slaw may be my fav. The combo of hot and sweet has a proven track record in palate pleasing, and that’s especially true when we’re talking about a cold salad.

Of course, how sweet, and how hot will be up to your personal tastes, as well as what you’re going to serve this with. If I’m going to toss this next too some spicy grilled sausages, then I will tone down the punch, whereas if I’m topping a sweet, smoky pulled pork sandwich, I might be a little more aggressive, like I was here.

Regardless of what exactly you put in yours, the key here is salting, and massaging your cut cabbage first (aka “cassage”). This not only draws out water, which actually sweetens up the flavor, but it also produces a flexible, yet still crunchy texture, which I think is lacking in many other “chop and mix” recipes.

I realize we’ve done coleslaws where we skip this step, which is fine if you slice your cabbage thin, and serve it relatively quickly, but for what I refer to as “real” coleslaw, the extra ten minutes is well worth it. Plus, once preserved in this way, your coleslaw will not only last days, but maybe get even better.

By the time I’d topped my soon to premiere boneless baby back rib sandwich, this slaw had been in the fridge for almost two days, and had developed even more flavor, while still retaining it’s raw crispness. So, stay tuned for that video, but in the meantime, I really do hope you give this great, hot and sweet mustard slaw a try soon. Enjoy!


Ingredients for 4 portions:
1 pound cabbage, cut in 1/2 inch slices
1 tablespoon kosher salt

For the dressing:
1/4 cup mayo
2 tablespoons Dijon
1 tablespoon grain mustard
1 to 2 tablespoons honey, or to taste
1 tablespoon apple cider vinegar
1/2 teaspoon cayenne, or to taste
fresh chives to garnish
-->

Friday, December 28, 2018

New Year’s “Beans and Belly” – Good Luck with This!

I wanted to sneak in this pork belly on black-eyed peas salad video before the New Year, to help ensure you a very lucky, and prosperous 2019. Of course, there’s no guarantee this roast pork belly on black-eyed peas salad recipe will bring you good fortune in the New Year, but what if it does? 

Either way, this is still one of the most delicious ways to enjoy both pork belly and black-eyed peas, and could not have been happier with how this came out. Since I’m still officially on vacation I’ll keep this post brief, but I did want to mention the bean soaking seen herein.

There are many articles online about this being an unnecessary step, and technically it is, but it’s been my experience that if you soak your beans the night before, they seem to hold their shape better, as well as cook a lot faster. So I say soak, but either way, I want to wish you all a very Happy New Year, and I really hope you start 2019 off with a big bowl of “beans and belly.” Enjoy!


Ingredients for 6 portions:
For the Pork Belly:
2 pound pork belly (skin removed)
1 tablespoon kosher salt, plus freshly ground black pepper and cayenne to taste
- Roast at 200 F. for 7 1/2 hours

For the Black Eyed Pea Salad:
1 cup dried black-eyed peas, soaked overnight, drained
2 quarts fresh water
1 tablespoon kosher salt
1 bay leaf
Dressing:
2 tablespoons Dijon mustard
1/3 cup seasoned rice wine vinegar
2 tablespoon white vinegar
1/3 cup mild olive oil or vegetable oil
1 minced garlic clove
1/3 cup finely diced red onion
2 jalapeno, finely chopped
1 red bell pepper, finely diced
salt, freshly ground black pepper, and cayenne to taste
2 tablespoons chopped fresh parsley leaves
-->

Saturday, October 20, 2018

Green Chile Pesto and Roasted Chayote Squash Side Dish – Thanks, Rick!

If you’re going to steal one Rick Bayless recipe, you might as well steal two, which is exactly what I did here with this green chile pesto, and roasted chayote squash side dish. Like I said in the video, most great chefs encourage this type of thievery, as long as you give them credit, which I’m happy to do.

What I’m calling “Green Chile Pesto,” is really his Green Chile Adobo, but I thought my audience would better relate to a “pesto,” since that’s what this reminds me of the most. Although, I’m not sure how it would be in a pasta, and don’t have any immediate plans to find out.

What it was great in, was this very simple chayote squash dish, which is really more of a warm salad. If you can find chayote near you, I recommend you give it a try, but if not, grilled zucchini or other summer squash would also work, as would something like roasted acorn or delicata squash.

I’d try to choose a fairly mild olive oil for this, since we have enough heat and bitterness from the peppers. Which reminds me, don’t over blend this. While some chefs claim it’s just a wives tale, I’ve found that if you over-process an olive oil-based sauce, especially ones with garlic in them, it can get very bitter. Other than that, not much can go wrong, and so on behalf of Chef Bayless and myself, I’d like to say, we really do hope you give it a try soon. Enjoy!


Ingredients for the Green Chile Pesto:
6 Serrano peppers
1 Poblano pepper
6 cloves garlic, still in the paper
1 bunch cilantro
1/2 bunch Italian parsley
1 1/2 teaspoon kosher salt (or about 3/4 teaspoon fine salt)
3/4 cup mild tasting olive oil, or vegetable oil
juice from 2 fresh limes*

* You can add the lime right to the pesto if you’re going to use it all at once as a sauce for something, but this seems to keep longer in the fridge without it added in, and so I prefer to add it to whatever I’m using it with instead.

For the Chayote Squash Side Dish:
3 Chayote squash, cut in 1-inch pieces
1 tablespoon olive oil
1/2 teaspoon kosher salt
juice from 1 lime (unless already added to your pesto)
2 or 3 heaping spoons of Green Chile Pesto
1/3 cup crumble soft goat cheese, plus more for the top
pumpkins seeds to garnish, optional
-->

Saturday, September 1, 2018

My Big Fat Greek Salad and Its Big Fat Unoriginal Name

I had a feeling I wasn’t the first person to think of this cinematic play on words, but like I said in the video, so many other people called this a big fat Greek salad, I figured I wouldn’t get in too much trouble. If I had to guess, it was probably the caterer on the set of the movie who first coined the name, or at least I hope so.

This is such a simple salad that there’s no need for me to share a bunch of tips and tricks, although I will reiterate the most important instruction of all.  Be sure to toss the salad with the vinegar first, before adding the olive oil. If you don’t, it will not taste as good. Which reminds me, giving the amounts here is very difficult, since this really should be made to your tastes, so please use the ingredient list below as a very rough outline.

If you need to make this the day before, I suggest making the dressing separate, and then mixing everything before the event.  I think this should only be dressed about 30 to 60 minutes before service for maximum enjoyment, but that’s just my approach, and some folks prefer an overnight marination. Regardless of how long you let your ingredients “marry,” you’re going to be enjoying one amazing salad, which is why I really do hope you give this a try soon. Enjoy!


Ingredients for 1 Big Fat Greek Salad:
2 large English cucumbers
2 cups halved cherry tomatoes
1/4 red onion, thinly sliced
1/2 red bell pepper, diced
1 cup sliced olives
2 tablespoons minced fresh oregano, or 1/2 teaspoon of dried
salt, freshly ground black pepper, cayenne to taste
1/4 cup red wine vinegar, or to taste
1/3 cup olive oil, or to taste
4 to 6 ounces feta cheese

Tuesday, June 20, 2017

The Brutus Salad – Watch Your Back, Caesar!

I don’t post a lot of salad videos, since, other than the dressing recipe, what am I going to teach you? Most people are pretty good when it comes to tossing things in a bowl, but I made an exception for what I’m calling a “Brutus.”

I discovered this salad at a great restaurant in Healdsburg, called Willis’s Seafood, where it was definitely not called a “Brutus,” but simply described as a, Little Gem Salad, Dijon Vinaigrette, Fuji Apples, Aged White Cheddar, Fresh Herbs, Fried Pecans.” It sounded amazing, and tasted even better.

It was so good, I joked that it could replace the Caesar as America’s favorite tossed salad, and a few beers later, the idea to call it the “Brutus” was born. I’m explaining this not only to give credit, where credit’s due, but also to make clear it has nothing to do with politics. Yes, nothing to do with it. Nothing at all.

Normally, I would tell you to add whatever you want to this salad, but not this time. Please make it exactly as shown. Having said that, you’ll of course have to adjust the dressing to your taste, but you already knew that. I really do hope you give this a try soon. Enjoy!


Ingredients for 4 portions:
For the dressing:
1/4 cup real French Dijon mustard
1/4 cup seasoned rice vinegar
1/4 cup vegetable oil
1/4 teaspoon Worcestershire sauce
freshly ground black pepper
cayenne to taste
- the dressing should be sharp and acidic, but please adjust to your taste
For the salad:
4 hearts of romaine, cut or torn into bite-sized pieces
2 ounces extra-sharp aged cheddar
1 apple, thinly sliced
2 tablespoons fresh tarragon leaves, chopped
2 tablespoons dill sprigs, chopped
3/4 cup pecan halves, toasted in 2 teaspoons vegetable oil, seasoned with salt and 1 teaspoon of white sugar

Wednesday, May 31, 2017

Smashed Cucumber Salad – I Crushed This

Your cooking skills might not be the best, but the word on the street is that you’re pretty good at smashing things, sometimes even on purpose. If that’s the case, this refreshing, and very addictive smashed cucumber salad is going to be perfect for you. Above and beyond whisking up an extremely simple dressing, the success of this recipe comes down to you being able to flatten a cucumber with something heavy.

It really is as easy as it sounds, and by crushing our cucumber before we cut it, we produce flavors that un-smashed cucs can’t. When you crush the cells in a vegetable, as opposed to cutting cleanly through them, certain compounds get mixed together, which can result in a significantly different flavor. 

This is not always a good thing, and onions are the perfect example. Use a sharp knife, and they’re sweet and mild. Use a dull knife, or that thing you ordered after seeing the infomercial at 2 AM, and you’ll get something much harsher. In fact, it’s no joke that most people who don’t like onions, grew up in a kitchen with dull knives.

However, when it comes to cucumber, these ruptured cells produce a more desirable flavor, and texture. The only decision you’re going to have to make, is how long to let the cucumbers marinate in the dressing, if at all. Many chefs will toss and serve immediately, while others like to let the cucumbers chill in the dressing for a little while in the fridge, which is the method I prefer.

You’ll just have to do some tests to see what you prefer, but either way, this is one of my all-time favorite cold summer side dishes, and one I really hope you try very soon. Enjoy!


Ingredients for about 6 portions:
2 English cucumbers (about 1 1/2 pounds total weight)
1 teaspoon granulated white sugar
1 1/2 teaspoons kosher salt, plus more as needed
2 garlic cloves, finely crushed
2 tablespoons seasoned rice vinegar
(or regular rice vinegar with an extra pinch of salt and sugar)
1 teaspoon soy sauce
1 teaspoon sesame oil
red pepper flakes, to taste
toasted sesame seeds to garnish

Friday, March 10, 2017

"Norcal" Nicoise Salad – Layered for Your Pleasure

I know I’ve made fun of salads served in Mason jars before, but when I was asked to contribute a layered Nicoise to an Allrecipes Easter feature, I immediately thought of this tragically hip presentation. Also, I didn’t have a straight-sided, see-through glass bowl to do the layered salad in.

I love a good Nicoise, and it’s perfect for layering, especially if you slice/chop up the ingredients first. Not only will your layers be easier to keep straight, but chopped salads are always a pleasure to toss with dressing. Speaking of which, I really enjoyed this avocado spiked French-style vinaigrette, and it paired perfectly with the rich, fatty, olive oil-packed tuna. 

Look for something from Spain or Italy, and you will be impressed with how much nicer it is than the stuff Charlie and his buddies are pushing. So, whether you composed this on a plate, in the classic fashion, or follow my lead, and create the world’s trendiest Nicoise, I really hope you give this a try soon. Enjoy!


Ingredients for Nicoise (amounts are up to you)
3-4 ounces per person olive-oil packed tuna
tender green beans
Yukon gold potatoes
cherry tomatoes
hard boiled eggs
Nicoise olives, or other pitted olives
parsley and/or chives
anchovy fillets, optional

Ingredients for the dressing:
1 tablespoon Dijon mustard
3 anchovy fillets
2 teaspoons minced shallots
1 teaspoon minced fresh tarragon
2 tablespoons lemon juice
3 tablespoons white wine vinegar
1/4 cup ripe avocado
1/3 cup olive oil, or more to taste
freshly ground black pepper
pinch cayenne
water as needed to adjust texture
salt to taste

Friday, July 29, 2016

Grilled Shrimp Louie – Dressing Up a Classic

I don’t do a lot of salad dressing videos, since it’s pretty much just adding things to a bowl, but when that dressing is going on a grilled shrimp Louie, I’ll make an exception. By the way, this is usually done with crab, but I think the smoky, grilled shrimp are a great summertime twist.

This is my take on a classic Louie dressing, and as with all such recipes, you’ll need to taste and adjust for acid, salt, and heat. Just be sure to wait until the dressing is nice and cold before tasting. You’ll get a more accurate reading, since that’s the temperature we’re going to be serving at.

If you do grill the shrimp, don’t toss it with the oil and lemon until right before you grill. This isn’t a marinade, and we don’t want the shrimp to start “cooking” in the acid. I really hope you give this a try soon. Enjoy!


Ingredients for about 1 3/4 cups:
1 cup mayonnaise
1/3 cup ketchup
1/4 cup crème fraiche
1 tablespoon freshly squeezed lemon juice
1 teaspoon apple cider vinegar
1 packed teaspoon brown sugar
1 teaspoon paprika
1/8 teaspoon cayenne
1/4 teaspoon kosher salt, or to taste
1/2 teaspoon Worcestershire sauce
2 tablespoons minced green onion
2 tablespoons freshly chopped parsley

For the grilled shrimp:
2 pounds peeled and deveined shrimp
1 tablespoon olive oil
juice from 1/2 lemon
1/4 teaspoon smoked paprika
1 teaspoon kosher salt

Tuesday, July 19, 2016

This Tuna Poke is No Joke

There are many of foods I’ll stand in line for, and/or pay too much for, but Hawaiian-style tuna poke isn’t one of them. I can’t make a world-class croissant at home. I can make a decent one, but not a perfect one, so I’ll happily queue up at a boulangerie that does.

However, when it comes to poke, the technique is so basic that even the most inexperienced cooks can get something pretty much identical to what they’d get out. There’s one catch though. You have to use only the freshest possible tuna, even if that means it’s frozen.

Hopefully you’ll be able to get a hold of some fresh, sushi-grade tuna, but if you can’t, frozen will work. What many people don’t realize, is that most of the fish they enjoy at their favorite sushi restaurants has actually been frozen beforehand anyway. Google it, it’s true.

So, as long as the tuna is Grade A, or sushi grade, the frozen variety will work. Above and beyond that, all the other ingredients, except for the soy sauce, are optional. So, please use this video as merely a guide to the technique, understanding that this will work with so many different ingredients. I really hope you give this a try soon. Enjoy!


Makes 4 portions Tuna Poke:
1 pound sushi-grade ahi tuna (aka yellowfin), cut into about 3/4-inch cubes
1/4 cup high-quality soy sauce
2 tablespoons sesame oil
1 teaspoon grated fresh ginger root
1/3 cup thinly sliced green onions
2 tablespoons roasted macadamia nuts, crushed
1 tablespoon finely crumbled dried seaweed
1/2 teaspoon hot red pepper flakes
1/2 teaspoon Kosher salt, or to taste
1 teaspoon toasted sesame seeds
Other delicious additions include (add to finished poke, not the marinade, otherwise you may lose that gorgeous appearance):
- seasoned rice vinegar
- lemon or lime juice

* Toss tuna with marinade, and chill for 2 hours in the fridge before serving.

Thursday, October 29, 2015

A Waldorf Salad by Any Other Name

As I joked about in the video, a fruit salad has to be pretty damn good to actually get a name, and the venerable Waldorf salad is certainly worthy. 

I realize that there are a small group of you who won’t be able to wrap your heads around mayonnaise with fruit, and that’s a shame, since it means you won’t get to enjoy one of the great combinations of all time. By the way, if you are one of the aforementioned people, but like mayo slathered all over your sandwich, containing slices of sweet, ripe tomato, and caramelized onions, then you have some explaining to do. Also, coleslaw. I rest my case.

Embellish this as you see fit, but I really like it best with just the four ingredients seen here. Things like dried cranberries can add a nice seasonal touch, but for me, the chewy fruit gets in the way of that addictive crunchy/crisp texture. I really hope you give this old-school, but timeless Waldorf salad a try soon. Enjoy!


Ingredients for about 1 cup dressing (enough for 2 Waldorf salads below):
3/4 cup mayonnaise
1/4 cup crème fraiche or sour cream (I used CF)
juice from 1/2 lemon
1/2 teaspoon sugar
1/4 teaspoon salt
pinch freshly ground black pepper
pinch cayenne
1 tablespoon finely chopped tarragon

For 2 large or 4 appetizer sized Waldorf salads:
2 large crisp, sweet apples, cut in 1/2 inch cubes
1 cup small cubed celery root
1 cup quartered seedless grapes
1/2 cup toasted walnuts pieces

Friday, August 14, 2015

Grilled Pattypan Squash with Hot Chorizo Vinaigrette – Almost Stuffed

Michele does a fantastic, sausage-stuffed pattypan squash, which was actually how these were supposed to be prepared, but someone, and we won’t name names, didn’t pay attention to buying ones of a uniform size, which is kind of a big deal if you want them to bake evenly. Okay, it was me.

In an attempt to redeem myself, I decided to grill them instead – a cooking method where any size will work – and top them with a hot chorizo vinaigrette. It’s something I’ve wanted to try for a while, and it really turned out to be a wonderful combination.

The ingredients below are just a rough guide, and you’ll have to figure out your own amounts, depending on how much squash you grill, but I do recommend a 1-to-1 ratio of sherry vinegar to olive oil/rendered chorizo fat.

I used a veal chorizo, which was very lean, so I had to add a good amount of olive oil. If you use pork chorizo, you’ll have a lot of rendered fat, so you may want to drain off most of it, keeping a few tablespoons, before adding your oil and vinegar.

Speaking of oil, don’t put any on your squash before you toss it on the grill. I used to do this myself, because it seemed logical, but it’s a bad idea. The dripping oil causes flare-ups that can make your veggies taste like gasoline, which is not good eats. Other than that, not much can go wrong with this simple summer dish. I hope you give it a try soon. Enjoy!


Ingredients for 4 portions
8 pattypan squash
kosher salt to taste
6-8 ounces fresh, raw chorizo sausage
(crumbled fine, and browned well in olive oil)
*you want to leave about 2 tablespoons rendered chorizo fat in the pan
1/4 cup extra virgin olive oil
1/3 cup sherry vinegar (or, use any vinegar you like)
splash of water to maintain moisture level if needed
1 tablespoon freshly sliced mint leaves