Tuesday, January 29, 2019

Queso Dip – Less is More, Again

I used to make something very similar to this queso dip at the Mexican restaurant I worked at in college, and when I first started, it took me a little while to fully understand the real secret to its addictive irresistibility. We called it “chili con queso,” and served it hot, and I loved everything about it, except I thought it should be thicker, so you could get more on the chip with each dip.

But, eventually I realized the saucy texture was the key, and that making it thicker would’ve ruined everything. Instead of too much 
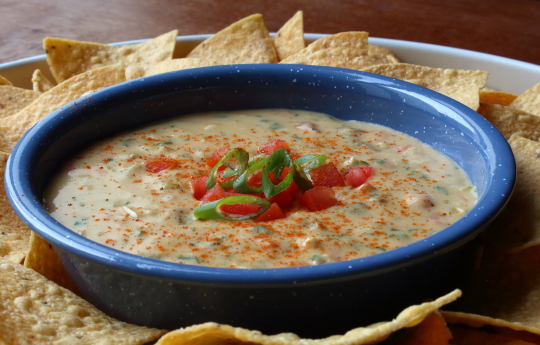
cheese piled up on your chip, we just get a beautiful, silky coating, and as soon as you finish one, you can’t wait to dip another, and another, and another, until there are no chips left.

Just be careful not to cook the mixture for too long after adding the cheese. I turn the heat off a few seconds after the cheese melts, but you can cook it for another minute or so if you do want it little thicker. However, there’s a danger that your cheese will get grainy, and you’ll lose that luxurious, smooth mouthfeel.

Since this doesn’t get completely firm, even after cooling down, you can make this ahead of time, and just leave it out, although that can be a risky maneuver, as there may not be a lot left when your guests arrive. Either way, whether you’re making this for a Super Bowl party, or any other kind of party, including parties of one, I really do hope you give this a try soon. Enjoy!


Ingredients for 12 Portions:
1/2 pound sharp cheddar cheese, shredded (about 2 1/2 to 3 cups)
1 tablespoon cornstarch
1 tablespoon butter
2 minced garlic cloves
1 bunch green onion, light parts only, sliced (save green tops for garnish)
1 teaspoon kosher salt, plus more to taste
1/4 teaspoon ground chipotle
1/2 teaspoon cumin
1 can (4-oz) fire-roasted diced green chilies
1/2 cup diced seeded Roma tomatoes
1 can (12-oz) evaporated milk
1/4 cup finely chopped cilantro
pinch of cayenne
-->

Friday, January 25, 2019

Ram Wings (Rosemary, Ancho, Molasses Glazed Chicken Wings) – Acronymically Delicious

Overly contrived recipes are usually a bad idea, but these rosemary, ancho, and molasses glazed chicken wings really did come out very well, despite the fact that those ingredients were only chosen because they spelled out the word, “ram.” 

In case you’re not from around here, there's a big football game coming up, and the Los Angeles Rams are one of the teams involved. The other team shall not be named.

In addition to serving as this year's Super Bowl snack idea video, it’s also a great tutorial for the easiest of all chicken wing methods, and that would be the crowd pleasing, finger-messing “sticky wings.” The technique simply involves soaking them in a sweet, spicy marinade, baking them wet, and then tossing them with a finishing glaze.

That’s all there is to it, and this method will work no matter which spices, or sweeteners you go with. The sky’s the limits, and it just depending on what you like, and/or what you want to spell out. No matter what goes into yours, I really do hope you give them a try soon. Enjoy!


Ingredients for 4 large portions:
2 1/2 pounds chicken wing sections
2 teaspoons vegetable oil
3 teaspoons kosher salt
1 tablespoon finely minced rosemary
2 or 3 tablespoons ground ancho chili powder, or other chili powder*
1/2 teaspoon cayenne
3 tablespoons white distilled vinegar
1 or 2 tablespoons molasses (can substitute maple syrup, honey, or brown sugar)
- Bake at 400 F. for 45 minutes or until the bones come out clean

For the finishing glaze (use a clean bowl):
2 teaspoons molasses
1 tablespoon honey
1 teaspoon ancho chili powder
pinch of cayenne
pinch of salt
1 fresh juiced lime

* If you can't find ancho chili powder, you can use 4 parts paprika mixed with 1 part ground chipotle.
-->

Tuesday, January 22, 2019

Tuscan Onion Soup (Carabaccia) – French Onion Soup Before It Was French

I’ve wanted to make carabaccia ever since I found out it was the ancient ancestor of French onion soup. Not only is that an interesting fact, but it’s also a great addition to your dinner party conversation repertoire, especially where there are French chefs involved.

Okay, now let’s talk cinnamon. The safe play is to not add any, and live happily ever after. However, in very, very small amounts, it really does add a mysterious, wonderfully warming background note that you actually might enjoy. There’s only one way to find out, but please proceed with caution. Too much will render the soup inedible, and there’s really no way to know what “too much” is.

As I mentioned in the video, if you want to cut down on the stirring, you can cook the onions in a roasting pan. Just pop them in a 325 F. oven until they’re done, stirring a few times along the way. How long exactly is anyone’s guess, but just like the stove-top method, take your time, and wait until they are very soft.

So, whether you’re a culinary history buff like me, and want to taste what French onion soup tasted like 500 years ago, or it’s freezing outside, and a steaming bowl of something delicious sounds good, or both, I really do hope you give this a try soon. Enjoy!


Ingredients for 6 Portions:
4 pounds red onions, sliced
2 tablespoons olive oil
1 tablespoon kosher salt
3 sage leaves, plus more for toast
1/4 cup finely ground almonds
very tiny pinch of cinnamon*
3 tablespoons red wine vinegar, or to taste
5-6 cups beef, chicken, or vegetable broth
freshly ground black pepper
freshly grated pecorino or parmesan cheese

For the toast:
3 thick slices Italian bread, halved
dress with olive oil, sage and grated Pecorino or Parmigiano-Reggiano cheese
- Toast in a 400 F. oven for 15 minutes or until browned.

* While traditional, many people don’t enjoy the effect cinnamon has on the sweetness of the soup, so you may want to omit it, or add an extremely small amount, and then adjust from there. You can also make the soup without any, and then experiment by adding a trace amount to a small sample cup, and see what you think.
-->

Friday, January 18, 2019

Beef Rendang and the Case of the Invisible Sauce

Don’t think of this amazing Indonesian beef curry as not having a sauce, think of it as not needing a sauce. By the way, it has a sauce – you just can’t see it. Flavorless water evaporates when you reduce a pan sauce, like we’re doing here, but fat doesn’t, nor does flavor, which is what makes this such a unique, and deliciously addictive dish.

Originally the recipe was developed as a way to preserve meat in hot and humid Indonesia, which is why it was cooked until dry. The lack of moisture, along with all these naturally antimicrobial ingredients meant you could keep this around for weeks without it spoiling, and apparently people enjoyed the taste and texture so much, they continued making it this way long after refrigeration was available.

Having said that, if you do want some sauce to serve with it, simply add more water during the cooking, or cover for part of the time, and you’ll be all set. Which reminds me, if you do cook this the day before, as recommended, you’ll want to add a big splash the water to the pan when you reheat it. Add some water, cover it, and when you think it’s heated through, uncover, crank the heat, and cook until it reaches your desired degree of dryness.

The ingredient list below does contain a few semi-exotic items, so I’ve added what to substitute with in parentheses, but all in all most of these things should not be that hard to find, especially online. But whether you make a few substitutions or not, I really do hope you give this intensely flavorful, and invisibly-sauced beef rendang a try soon. Enjoy!


Ingredients for 4 large portions Beef Rendang:
4 shallots, sliced (or red onion)
6 garlic cloves
1.5 inch piece fresh ginger, peeled, sliced
1.5 inch piece galangal (or ginger)
1 Fresno red chili pepper
2 Serrano chili pepper
1 tablespoon kosher salt, plus more to taste
1 or 2 tablespoons red chili flakes, depending on desired heat
1 teaspoon ground coriander
1/2 teaspoon ground turmeric
1/8 teaspoon ground cardamom
1/8 teaspoon nutmeg
2 tablespoons vegetable oil
2 1/2 pounds beef chuck, cut in 2-inch pieces
1/2 stalk lemongrass, lighter part, bruised with back of knife
1 can coconut milk
1 generous tablespoon brown sugar
2 teaspoons tamarind paste (or zest from a lime and lemon, plus juice from 1 lime)
steamed rice for service, garnished with cilantro and lime if desired
-->

Tuesday, January 15, 2019

Folded Pork Cutlets – Layers of Flavor, Literally

I thought I’d seen all there was to see when it came to pan-fried pork cutlets, but then I saw something called Katsu “Mille-Feuille,” and I realized I hadn’t seen anything yet. Okay, I’m being a little dramatic, but I really loved the unusual look and feel, as well as the internal flavoring opportunities the multi-layer technique provides.

Besides figuring out what to flavor yours with, the other main challenge is deciding how long to cook them. The 4 to 5 minute time I gave is just a guess, since it depends on the thickness of, and fillings in, your cutlet. Although the folding and cheese inside will help keep things moist, pork tenderloin can dry out, so I don’t recommend going past 145 F. internal temp.

However, the problem with testing by poking it with a thermometer is that you’ll have hot juices spurting out, which would be a shame. This is why I like to go with the poke test, and when it springs back enthusiastically, it’s usually done. Also, a few minutes of resting time will help even out the heat, and moisture, but by the time you add your sides, and get to the table, you should be fine.

As I mentioned in the video, this method screams for personalization, and I look forward to seeing what you come up with. Whatever that may be, I really do hope you give it a try soon. Enjoy!


Ingredients for 2 Portions:
1 trimmed pork tenderloin, split in half lengthwise
salt, freshly ground black pepper, and cayenne to taste
4 teaspoons Dijon mustard
2 ounces grated cheese, or as needed
2 tablespoons freshly chopped Italian parsley
For the breading:
enough all-purpose flour to coat
beaten egg
panko, or regular plain breadcrumbs
olive oil for frying (at least 1/4 inch of oil in the pan is recommended)
-->

Friday, January 11, 2019

Samosadilla (Samosa Quesadilla) – Flat Better

I love samosas, but I don’t necessarily love all the work and mess involved with assembling and deep-frying them, which is why I’m such a huge fan of this quesadilla approach. Plus, above and beyond the faster, simpler method, the results may be even better than the original. Okay, hear me out.

While it’s true a perfectly made, expertly fried, and quickly served samosa is superior to this version, that can be a very rare combination of events. By comparison, this is almost impossible to mess up, and if you use enough oil in your pan, you should be able to achieve a beautifully browned, crispy crust that rivals something out of a deep fryer.

Like I said in the video, even if you don’t make samosadillas, the filling is a world-class potato salad in its own right. A scoop of this next to some grilled meat, like tandoori chicken for example, would make for a gorgeous plate of food. Fair warning though, Michele and I like big, bold flavors, so please feel free to adjust the ingredient amounts below to your tastes. Whether they’re enjoyed hot, warm, room temp, or cold, we really do hope you give these samosadillas a try soon. Enjoy!


Ingredients for about 6 Portions:
6 large flour tortillas
1 tablespoon olive oil
1 tablespoon butter
1 large yellow onion, diced
3 cloves finely chopped garlic
1 minced Serrano chile
1 1/2 teaspoons finely chopped fresh ginger
1 teaspoon kosher salt plus more to taste
1 1/2 teaspoon garam masala
1 teaspoon ground cumin
1/2 teaspoon ground corinader
1/2 teaspoon turmeric            
1/4 teaspoon cayenne
1 cup green peas
1 1/2 pounds cubed Yukon gold potatoes, cooked until tender in salted water
2 tablespoons chopped cilantro
juice from 1 lemon
salt to taste once mixed

For the Cilantro Lime Chutney Sauce:
1 large or 2 small bunches fresh cilantro
1/3 cup fresh picked mint leaves
1/4 cup sliced green onions
1 sliced Serrano chile
1 or 2 limes, juiced
1/2 cup plain yogurt
pinch of salt, optional
-->

Tuesday, January 8, 2019

Brazilian Cheese Bread (Pao de Queijo) – Fast, Fun, and Inadvertently Gluten-Free

Brazilian cheese bread is very easy to make, and features a chewy, cheesy, bready center, encased in a beautiful, thin, pastry crust. It also happens to be gluten-free, thanks to it being root-rich. These are made using tapioca flour, which not only makes them grain-free, but is also responsible for their very unique texture.

Tapioca flour is pretty easy to find these days, and I get mine from a guy named Bob, who runs a mill, but if your local market doesn’t carry it, I recommend finding some online. There are lots of fun recipes you can make in addition to these, like homemade tapioca pearls for bubble tea, just to give one enticing example.

As I mentioned in the video, you can easily adjust the thickness of your dough by adding another splash of milk, or more tapioca flour depending on what you're into. Some folks swear by a thinner batter, which they bake in muffin tins, but to me those come out too much like popovers, and don’t have the same chewy, cheesy center.

Happily, Brazilian cheese bread ingredients are fairly inexpensive, which means you can play around with a few batches, and see for yourself. No matter what you end up with, I really do hope you give these a try soon. Enjoy!


Ingredients for 24 Brazilian Cheese Breads:
(Please note, I only made half a batch)
 2 1/4 cups tapioca flour, plus more as needed to adjust texture
1/2 cup lightly flavored olive oil and/or vegetable oil
2/3 cup milk
1 teaspoon kosher salt
2 ounces freshly grated mozzarella (about 1/2 cup)
2 ounces freshly and finely grated Parmigiano-Reggiano* (about a cup unpacked)
2 large beaten eggs
pinch of cayenne
-->

Wednesday, January 2, 2019

Meatball-Stuffed Garlic Bread Sliders – A Hole Lot of Awesome

I’ve wanted to do a video for baked cheeseburger sliders for a while now, but I’ve also been craving a meatball sub, so long story short, this is what I ended up with, and they were amazing. Above and beyond some decent ingredients, the real secret to these beauties is placing the meatball in through the top of the roll, versus splitting and stuffing in the traditional manner.

I can’t explain exactly why, but there’s something very special about these, and they really were a lot of fun to eat. Maybe it ‘s the symmetry, or center of gravity, but they just feel right in your hand. I’m not sure who invented this technique, but I first saw it on a blog called, Cooking for Keeps, so they get the credit for now.

Like I mention in the video, this easy procedure would lend itself to all kinds of variations, and I expect to see some great ones shared on social media soon. We’re getting close to the Super Bowl, and like I said before, it’s not about who wins the trophy, but rather who wins the snack table, and if you show up with these, that will be you. So, I really do hope you give these meatballs-stuffed garlic bread sliders a try soon. Enjoy!


Ingredients for 18 Meatball-Stuffed Garlic Bread Sliders:
18 dinner rolls (I used Hawaiian rolls, but will try regular less-sweet ones next time)
3 tablespoons butter infused with 3 or 4 cloves of crushed or minced garlic
1 pound grass-fed beef
1 diced yellow onion and a few cloves of garlic sautéed until soft in olive oil
2 tablespoons freshly chopped parsley, plus more for garnish
1 large egg
1/4 cup plain breadcrumbs
1 cup grated fontina cheese, divided (big handful in the meatball mix, and the rest on top)
2 teaspoons kosher salt
freshly ground black pepper and cayenne to taste
2 cups prepared tomato sauce
freshly grated Parmigiano-Reggiano cheese for the top
-->