Tuesday, February 27, 2018

Seafood Sausage – Behold, the Rarest of All the Sausages

This seafood sausage recipe is one of those dishes you learn in culinary school, and then never make in a restaurant, the rest of your career. Unlike your more common meat-based sausages, which are made from assorted scraps, and you really don’t want to know, these seafood sausages need pristine product to shine, thereby eliminating the money-saving incentive of making sausage.

However, despite their lack of popularity, these really are a great way to take less than thrilling seafood, like some sleepy sole, and previously frozen salmon, and make something that seems far more special. The flavor is lovely, and the texture is similar to a boudin blanc, or white hot dog, if you prefer.

If you want something with a courser texture, simply make the sausage mixture as shown, but then fold in a few handfuls of chopped shrimp, scallop, or any other seafood. Once cooked, and sliced, you’ll see pieces of whatever you added studding the link. I actually prefer the smooth style, but it’s fun to experiment. Either way, I really do hope you give these a try soon. Enjoy!


Ingredients for 4 Seafood Sausages:
8 ounces boneless, skinless sole or other white fish
4 ounces boneless, skinless salmon
4 ounces peeled, deveined shrimp
2 tablespoons plain dry breadcrumbs
4 large egg whites
1 large whole egg
2 teaspoons kosher salt (or maybe 1 1/4 teaspoon fine salt)
cayenne to taste
2 tablespoons sautéed shallots
2 tablespoons chopped Italian parsley

For the sauce:
2 tablespoons water
1 juicy lemon
2 tablespoons cold butter
1 tablespoon chopped Italian parsley
salt to taste

Friday, February 23, 2018

Homemade Corn Tortillas – Seconds to Learn, Years to Master

Even though they only require a few of ingredients, and the technique to make them only takes a few seconds to learn, homemade corn tortillas do take a fair amount of experience to master, because of all the variables. But, don’t let that stop you from trying, since the results, even as produced by a novice, are vastly superior to ones from the grocery store. They’re also significantly cheaper, but the “vastly superior” part is more than enough reason.

That’s because a bag of Maseca, which is the most commonly found brand of masa flour in U.S. grocery stores, and the one I used, is very inexpensive, and will make hundreds of tortillas. So, the instant corn masa flour isn’t a variable, but pretty much everything else is. From the amount of water, to how much salt, to how hot a pan to use, to how long to cook them; everyone seems to have a little bit different system.

When it comes to the water, you’ll know you have the right amount, if your tortillas press out to a nice round, relatively smooth-edged shape. If the outside edge of the tortilla has cracks once pressed, then you need more water. On the other hand, if the tortilla sticks to your fingers, or breaks apart getting it off the plastic, then it was too wet. Adjust accordingly. And like I said, give yourself a few years to experiment.

As far as the pan, I go with a cast-iron skillet, which I get nice and hot over high heat, and then I’ll back it down to about medium while I cook my tortillas. I also tend to cook mine a little longer in the pan than is traditional, but I enjoy that nice, lightly-toasted corn flavor you get when a little bit of browning occurs. A few extra seconds in the pan is fine, as long as they are stacked, and wrapped in the towel, which is probably the most important step in the entire operation.

In fact, eat one of these right from the pan, and then compare it to one that you’ve let steam together with the rest of the tortillas in the towel. You’ll be truly amazed at the difference. So, if you enjoy store-bought corn tortillas, but always wondered what the real stuff was like, I hope you give these a try soon. Enjoy!


Ingredients for about 10 Corn Tortillas:
1 cup instant corn masa flour (aka masa harina)
1/2 teaspoon kosher salt
3/4 cup hot water (about 130 F.)
- adjust with more water or masa flour as needed

Tuesday, February 20, 2018

Green Chicken Chili – Sorry, Red and White, But There’s a New Color in Town

If I had to pick a favorite color chili, it would have to be green. And, if I had to pick a favorite kind of green chili, it would be this chicken and white bean green chili, which, notwithstanding a very minor pumpkin seed issue, really came out amazing.

A true “chili verde” is made by roasting and pureeing fresh tomatillos, which is kind of labor intensive, if you can even find fresh tomatillos, so we’re going with a ready-to-use green salsa from the market. You should be able to chose from several varieties, but just be sure to read the labels carefully. Tomatillos must be the first ingredient, followed by onion, and chilies.

If you never had tomatillo before, I’d describe it as having a less sweet, slightly more acidic, but fruitier, tomato-like flavor. It’s very bright, and refreshing, and makes a chili prepared with it especially excellent for pairing with things like cornbread, or homemade corn tortillas. 

Once you find some tomatillo salsa, there’s not a lot that can go wrong, as we’re simply going to simmer everything until tender, assuming you’re using the recommended thighs. If you decided to use chicken breast, you’ll only need to simmer it until it’s cooked through, otherwise, unlike the thigh, it’ll get dry. No matter what you use, I really do hope you give this a try soon. Enjoy!


Ingredients for 4 to 6 portions of Green Chicken Chili:
3 pounds boneless skinless chicken thighs, seasoned with salt
1 bottle (24-oz) tomatillo-based salsa verde, about 3 cups
1/2 cup fire-roasted hatch chilies, or other roasted green chili
3 garlic cloves
1 large jalapeno, sliced
1/2 cup cilantro leaves
1 tablespoon cumin
1 teaspoon ground chipotle
1/2 teaspoon freshly ground black pepper
3/4 teaspoon dried oregano
1 teaspoon kosher salt, plus more as needed
2 cans white kidney beans (cannellini beans), drained, rinsed
sour cream and avocado to garnish

Friday, February 16, 2018

Chinese Scallion Pancakes – Happy New Year, Dog!

Happy Chinese New Year! It’s the Year of the Dog (and not the Manatee), and to celebrate I thought I’d show you my take on Chinese scallion pancakes. These fun-to-make flatbreads are a common fixture on menus around here, and while they all feature the same few ingredients, they come in a variety of thicknesses, which really affects the texture.

The thinner you make these, the crispier they’ll be, but you won’t get that nice, layered, oniony inside. On the other hand, if you make them too thick, they can be a little doughy inside, so I try to shoot for something in between. Speaking of inside, feel free to add pepper flakes or other appropriate embellishments before you roll these up.

Ideally, you leave the dough overnight before using, but I’ve always had great results with just a couple hours rest on the counter. If you do leave overnight, you’ll probably get a better flavor, and maybe texture, but the dough will be more elastic, and slightly more difficult to work with.

As far as the dipping sauce goes, I like to mix equal parts seasoned rice vinegar, and soy sauce, flavored with a shot of hot sauce, and maybe grating of fresh ginger. Toss in a few sliced green onions, and you’ll have yourself a very basic, but perfect condiment for these savory pancakes. Regardless of how you serve them, I really hope you give these a try soon. Enjoy, and gung hay fat choy!


Ingredients for 2 Chinese Scallion Pancakes:
one bunch green onions, mostly green parts, sliced thinly
For the dough:
2 cups bread or all-purpose flour
1 1/2 teaspoon kosher salt
3/4 cup hot water
- adjust with more flour or water to form a smooth, but sticky dough
For the oil mixture:
3 tablespoon veg oil
2 teaspoons sesame oil
1 tablespoon plus 1 teaspoon flour

- serve with dipping sauce, as described in the blog post

Tuesday, February 13, 2018

Flaming Greek Cheese (Saganaki) – Burning For You

I usually try to squeeze in one more sexy dessert video before Valentine’s Day, but instead I opted for this show-stopping, and super-savory saganaki. What it lacks in chocolate, it more than makes up in being on fire. I know what you’re probably thinking… what about a flaming chocolate dessert? Maybe next year.

In case you’re wondering, the original saganaki was not flambéed. This flaming cheese ritual was started by restaurateurs in Chicago, who were hoping a little bit of showmanship would help increase cheese appetizer sales, which it certainly did. They also made the experience interactive by encouraging customers to yell, “Opa!” as the plate was being ignited. If there’s one thing people love even more that flaming fried cheese, it’s yelling.

I really love kasseri cheese for this, since it holds its shape, crusts up nicely, and melts beautifully. I’ve also done this with a cheese called haloumi, which is tasty, but doesn’t melt at all, and for me that’s the best part. Beside those two, you can also use graviera, kefalograviera, kefalotyri, or even a firm feta cheese. No matter which cheese you use, I really do hope you give this a try soon. Enjoy!


Ingredients for 2 large portions:
4 ounce slab of kasseri cheese (about 3/8 inch thick), or other cheeses listed above
water and flour as needed
1 tablespoon olive oil
2 tablespoons brandy, room temp
1/2 lemon to squeeze over, or to taste
1 tablespoon freshly chopped Italian parsley
sliced fresh or grilled bread to serve alongside

Friday, February 9, 2018

Creole Crab Noodles – Mardi Gras Fusion

I’m calling this Creole crab noodles recipe an “experiment,” but it didn’t really feel like one, since I was sure it was going to come out really well, which it did. Crab, and its old friends, the Holy Trinity, are a classic combo, and so it was no surprise they worked so well in an Asian-style, rice noodle dish.

If you can get fresh crab meat, by all means use that, but if not, pretty much every large grocery chain carries pasteurized crab in 8-ounce plastic tubs, which works perfectly fine for this. And if shellfish isn’t your thing, I’ve got some great news. This exact same dish can be made with literally any other other meat and/or vegetable.

You can also do this with your favorite pasta, but like I said in the video, there are few foods as addictive, and fun to eat as rice noodles, so I’d advise against it. Besides, you can finally have that gluten-free friend of yours over to make up for all those pizza-night invites. So, whether you make this for Mardi Gras or not, I really do hope you give it a try soon. Enjoy!


Ingredients for 2 large portions:
8 ounces crab meat
2 tablespoons vegetable oil
1/3 cup finely diced green onions, plus more for garnish
1/3 cup finely diced celery
1/3 cup finely diced hot and/or sweet peppers
8 ounces rice noodles, soaked, drained

For the sauce:
3 cloves crushed garlic
3 tablespoons ketchup
1/4 cup seasoned rice vinegar
1 tablespoon soy sauce
1 tablespoon fish sauce
1 teaspoon paprika
1 teaspoon cumin
1/2 teaspoon cayenne

Tuesday, February 6, 2018

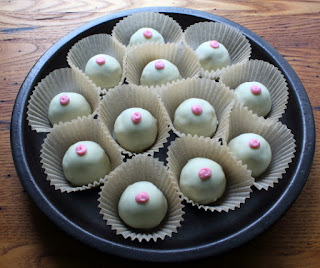
Nipples of Venus (Capezzoli di Venere) - Keeping Abreast of the Latest in Valentine’s Day Confections

I don’t remember much about the movie, Amadeus, which isn’t surprising, since I don’t remember that much about the early eighties in general, but I do recall the famous “Nipples of Venus” scene. At the time, I wondered if that was actually a real thing, or just something made up for the movie, but since there was no Internet yet, I never found out.

Fast forward thirty-plus years later, and inspired by a viewer’s request, I finally learned that these were in fact real, and very delicious, thanks in part to star of the show, chestnuts. While not a common ingredient, chestnuts aren’t that hard to find, and worth the effort, since they work really well in this.

If you must, another nut like almond, or hazelnut, should work about the same, especially when you consider your guest, or guests, will be fairly distracted by the eye-opening appearance. Speaking of Netflix and chill, you could show Amadeus after dinner, with these served as a sexy snack during the viewing. From there, you’re on your own. Regardless of whether you serve these on Valentine’s Day or not, I still really hope you give them a try soon. Enjoy!


Ingredients for about 24 Nipples of Venus:
5 tablespoons unsalted butter, room temp
1/3 cup white sugar
6 ounces dark chocolate
14 ounces whole chestnuts
pinch of salt
pinch of cayenne
1 teaspoon vanilla extract
1/4 cup brandy
*8 ounces white chocolate, chopped, divided
1/3 cup powdered sugar
enough milk to make a very thick paste
1 or 2 drops red food coloring

*This is more white chocolate than you need for coating, but that's how this stuff works. Just eat the rest. 

Friday, February 2, 2018

Deviled Ham is Coming Back! Start Spreading the News

Deviled ham isn’t nearly as popular as it used to be, which even in its heyday, wasn’t very popular, and that’s a shame, since it’s such a delicious, and easy-to-make spread. By the way, its decline in popularity was a major factor in the collapse of America’s steamed ham industry. Just ask any Simpsons fan.

Besides providing a tasty treat, it’s always nice bringing something that no one else will. That means there’s no added stress wondering if your [insert popular dip or spread name here] is the best. I’m proud of my guacamole, but I don’t need it judged against three others. Besides, it's all politics.

I’d be happy to give you some additional tips here, but there aren’t any. Just be sure to taste and adjust for heat, and salt. The saltiness of different hams will vary greatly, so just because I didn’t need to add extra, doesn’t mean you won’t. And, like I said in the video, not only is this a great spread, but it also make a magnificent sandwich. Regardless of your delivery system, I hope you give this a try soon. Enjoy!


Ingredients for about 4 cups Deviled Ham:
1 1/2 pound smoked ham, cut into cubes
1/4 cup diced onion
1/4 cup chopped celery, with some leaves included
1/2 cup shredded hot pepper cheddar, or other cheese, optional
1/4 cup Dijon mustard
2 tablespoons hot sauce
1 teaspoon cayenne
1 tablespoon Worcestershire sauce
2/3 cup mayonnaise, plus more if needed
salt to taste
chives and pickled red peppers to garnish