Friday, December 28, 2018

New Year’s “Beans and Belly” – Good Luck with This!

I wanted to sneak in this pork belly on black-eyed peas salad video before the New Year, to help ensure you a very lucky, and prosperous 2019. Of course, there’s no guarantee this roast pork belly on black-eyed peas salad recipe will bring you good fortune in the New Year, but what if it does? 

Either way, this is still one of the most delicious ways to enjoy both pork belly and black-eyed peas, and could not have been happier with how this came out. Since I’m still officially on vacation I’ll keep this post brief, but I did want to mention the bean soaking seen herein.

There are many articles online about this being an unnecessary step, and technically it is, but it’s been my experience that if you soak your beans the night before, they seem to hold their shape better, as well as cook a lot faster. So I say soak, but either way, I want to wish you all a very Happy New Year, and I really hope you start 2019 off with a big bowl of “beans and belly.” Enjoy!


Ingredients for 6 portions:
For the Pork Belly:
2 pound pork belly (skin removed)
1 tablespoon kosher salt, plus freshly ground black pepper and cayenne to taste
- Roast at 200 F. for 7 1/2 hours

For the Black Eyed Pea Salad:
1 cup dried black-eyed peas, soaked overnight, drained
2 quarts fresh water
1 tablespoon kosher salt
1 bay leaf
Dressing:
2 tablespoons Dijon mustard
1/3 cup seasoned rice wine vinegar
2 tablespoon white vinegar
1/3 cup mild olive oil or vegetable oil
1 minced garlic clove
1/3 cup finely diced red onion
2 jalapeno, finely chopped
1 red bell pepper, finely diced
salt, freshly ground black pepper, and cayenne to taste
2 tablespoons chopped fresh parsley leaves
-->

Tuesday, December 18, 2018

Chef John is on Christmas Break!

Michele and I would like to wish all of you a very Merry Christmas and Happy Holidays, as we get ready for a little winter break. One of the great perks of having corporate overlords, is that they require/encourage you to use up your vacation time, and thanks to my good friends at Meredith, and Allrecipes.com, that’s what I’ll be doing this week. 

However, after Christmas I will sneak in a video before New Year’s Day, which will feature a recipe guaranteed to bring you wealth and good fortune in 2019 (or your money back). So please stay tuned for that, and as always, enjoy!

Friday, December 14, 2018

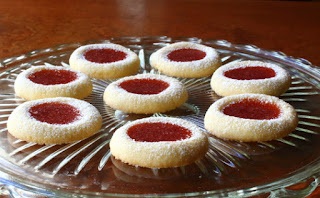
Thumbprint Cookies – Great Grandma Mitzi to the Rescue!

My mother, Pauline, made really nice thumbprint cookies, but unfortunately I never wrote down her recipe, and so I was forced to go online to find one, so I could refresh my memory. I knew the ingredients, but unless you have them in the right proportions, you won’t end up with that perfect melt-in-your-mouth texture these iconic cookies are known for.

Above and beyond the buttery mouthfeel, we also want a cookie that has perfectly smooth edges, with none of the dreaded cracks that give away a subpar recipe. So, I did an image search, and came across a recipe that looked very similar, and believe it or not, it was credited to a Great Grandma named “Mitzi.” Since my last name is Mitzewich, that pretty much sealed the deal.

I usually have to adapt recipes I steal online, but with these, I didn’t need to change a thing. They really were perfect, as advertised. So, sincere thanks to Stacy from Wicked Good Kitchen, and her Great Grandma, Mitzi.  My Mom would’ve loved these, although she would’ve asked where the chopped walnuts were, since she liked to add those to hers. 

Speaking of family, if you’re entertaining some of yours during the holidays, these beautiful cookies would make a lovely addition to your dessert table, which is why I really do hope you give them a try soon. Enjoy!


Ingredients to make 20 to 24 Thumbprint Cookies:
1 stick (1/2 cup) soft unsalted butter
1/3 cup powdered sugar (not sifted)
1 large egg yolk
1 teaspoon vanilla extract
1/8 teaspoon almond extract
1/4 teaspoon fine salt
1 1/4 cups all-purpose flour (5 ounces by weight)
1/2 cup fruit jam to fill centers

- 325 F. for 15 minutes

For the icing:
- Combine powdered sugar with a little milk or water, and mix until you have a consistency that will hold its shape when piped.
-->

Tuesday, December 11, 2018

Sicilian Christmas Pizza (Sfincione) – Finally, a Pizza with More Carbs

Topping a thick-crust pizza with breadcrumbs might sound like a strange idea, but it really is the secret sauce behind this Sicilian Christmas Pizza. Well, that and the actual secret sauce. Speaking of secrets, whether you tell your friends and family that the sauce is made with onions and anchovies is your business, but if you think that’ll turn them off, then maybe keep it to yourself, at least until they realize it’s one of the most delicious things they’ve ever had. Hey, all’s fair in love, war, and pizza.

Besides the crispy, cheesy, crumb topping, and super savory sauce, the other secret to this amazing pizza is the extremely wet and sticky dough. You could use a more standard pizza dough for this, but it won’t be the same experience. One reason we can get away with putting breadcrumbs on the top is the contrast between that texture, and the feather-light, spongy crust. Besides, if you use enough oil on your fingers, it’s really not that hard to work with anyway.

As usual, I’m not claiming any kind of authenticity here, so I don’t feel bad that I didn’t use casciocavallo, which is the traditional cheese for this pizza. I ended up using mozzarella, aged provolone, and pecorino, which I think work very well on this, but having said that, use whatever melty cheeses you like. The same goes for adding other toppings, but I can’t imagine anything making this any more amazing that it already is. Either way, whether it’s for Christmas, or another occasion, I really do hope you give this a try soon. Enjoy!


Ingredients for a 18" X 13" Sheet Pan:

For the dough:
2 cups warm water (105 to 110 F.)
1 package dry active yeast
1 1/2 teaspoons kosher salt
1 teaspoon sugar
3 tablespoons olive oil
4 1/3 cups all-purpose flour, or more as needed to achieve a very wet, sticky dough

For the sauce:
2 tablespoons olive oil
2 large yellow onions, diced
1 teaspoon red-pepper flakes
1 teaspoon freshly ground black pepper
1 tablespoon tomato paste
1 teaspoon dried oregano
9 oil-packed anchovy fillets
1 1/2 cups marinara or tomato sauce
1/4 cup water to rinse sauce container
salt to taste
Note: For best results, sauce should be highly seasoned

For the crumb topping:
3/4 cup fine plain dry bread crumbs
1 cup finely grated pecorino cheese
1 tablespoon anchovy oil
2 tablespoons olive oil

For the pizza:
3 ounces grated mozzarella
3 ounces aged provolone cheese

- Bake at 400 F. for about 35 minutes (go as long as you can without the crumbs on top burning, so that the crust cooks as much as possible)
-- For best results, slide cooked pizza on to a cooling rack to prevent the bottom from getting soggy. 
--- If bottom gets soggy, pizza slices can be reheated in a dry pan, which will crisp up the crust nicely.
-->

Tuesday, December 4, 2018

Kimchi Pancakes – Come for the Savory Pancake, Stay for the Dancing Fish Flakes

I remember getting a request for kimchi pancakes many years ago, and while I recall being intrigued, apparently not enough to actually research the recipe, and do a video for it. That all changed after seeing it on a local bar menu, where Michele and I enjoyed not one, but two orders of these incredibly tasty, and visually thrilling, savory pancakes.

I loved the taste and texture, but what really got my attention were the dancing bonito flakes on top. I’d never seen anything quite like that, and found it as mesmerizing, as I did delicious. As I mentioned in the video, those kimchi pancakes came with a little drizzle of spicy mayonnaise, which depending on how decadent of an experience you’re going for, isn’t a bad idea, especially if you plan on frying these up, and cutting them in wedges to serve as a snack at a party.

If you want a thicker, and more substantial kimchi pancake, you want to use less liquid, or more flour, so that your batter isn't quite as runny as mine. Personally, I enjoy this style a little more, since you end up with a thinner pancake that’s crispy around the edges, but still moist and tender inside. Having said that, you should definitely experiment with different textures to see what you like best.

These are also a perfect catchall for leftover meat and vegetables. Just chop it up, toss it in, and see what happens. Speaking of seeing what happens, if you want to watch fish flakes dance, you’ll have to find some bonito, which means finding an Asian market, or buying them online, and I highly recommend you do just that. Either way, I really do hope you give these a try soon. Enjoy!


Ingredients for 4 Appetizer Size Kimchi Pancakes:
1 1/2 cup chopped drained kimchi (12 ounce jar)
1 large egg
3 tablespoons kimchi juice
1/4 cup water
1 teaspoon brown sugar
1/2 teaspoon salt
1/2 teaspoon sesame oil
1/2 cup thinly sliced green onions
about 3/4 cup all purpose flour, or as needed
4 tablespoons bonito flakes for the top, optional
-->