Wednesday, May 31, 2017

Smashed Cucumber Salad – I Crushed This

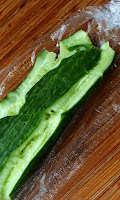
Your cooking skills might not be the best, but the word on the street is that you’re pretty good at smashing things, sometimes even on purpose. If that’s the case, this refreshing, and very addictive smashed cucumber salad is going to be perfect for you. Above and beyond whisking up an extremely simple dressing, the success of this recipe comes down to you being able to flatten a cucumber with something heavy.

It really is as easy as it sounds, and by crushing our cucumber before we cut it, we produce flavors that un-smashed cucs can’t. When you crush the cells in a vegetable, as opposed to cutting cleanly through them, certain compounds get mixed together, which can result in a significantly different flavor. 

This is not always a good thing, and onions are the perfect example. Use a sharp knife, and they’re sweet and mild. Use a dull knife, or that thing you ordered after seeing the infomercial at 2 AM, and you’ll get something much harsher. In fact, it’s no joke that most people who don’t like onions, grew up in a kitchen with dull knives.

However, when it comes to cucumber, these ruptured cells produce a more desirable flavor, and texture. The only decision you’re going to have to make, is how long to let the cucumbers marinate in the dressing, if at all. Many chefs will toss and serve immediately, while others like to let the cucumbers chill in the dressing for a little while in the fridge, which is the method I prefer.

You’ll just have to do some tests to see what you prefer, but either way, this is one of my all-time favorite cold summer side dishes, and one I really hope you try very soon. Enjoy!


Ingredients for about 6 portions:
2 English cucumbers (about 1 1/2 pounds total weight)
1 teaspoon granulated white sugar
1 1/2 teaspoons kosher salt, plus more as needed
2 garlic cloves, finely crushed
2 tablespoons seasoned rice vinegar
(or regular rice vinegar with an extra pinch of salt and sugar)
1 teaspoon soy sauce
1 teaspoon sesame oil
red pepper flakes, to taste
toasted sesame seeds to garnish

Tuesday, May 30, 2017

A Memorial Day-Away

Just a quick programing note that due to the holiday yesterday, today’s video will be posted Wednesday instead. I’m getting a little smarter in my old age, and actually try to take these off-days off, so I didn’t do a film yesterday. 

The good news is, we’ll be back tomorrow with a recipe video for one of my all-time favorite cold summer side dishes, quite possibly invloving cucumbers. Stay tuned! 

.

Friday, May 26, 2017

Ice Cream Cones – Because Egg White Omelets Shouldn’t Be a Thing

When you make homemade ice cream, you always end up with spare egg whites, which just happen to be one of the main ingredients in homemade ice cream cones – and if you think that’s merely an accident, you don’t fully understand how the food Gods operate.

They obviously want you to make homemade ice cream cones, since there’s no other good explanation. These are surprisingly easy, and as long as you can wad-up some foil into a cone, there isn’t any special equipment, or tools required. Actually, you really do need to use a silpat to line the baking sheet, but you need one of those anyway.

Like I suggest in the video, please test your batter with the first few cones, to make sure they’re tough enough to handle a scoop of ice cream. Even spread thin, this stuff is fairly sturdy, but by adding more flour to the batter, you get a thicker layer on the pan, and that means a stronger, tougher cone.

You can also roll these into cigar-shaped cookies, or press over a ramekin to form an edible bowl. Regardless of the shape, I hope you make some homemade ice cream, and then sacrifice a few egg whites to the heavens, and make these crispy cones soon. Enjoy!


Ingredients for 8-10 cones:
2 large egg whites
½ cup white sugar
2 tablespoons whole milk
1/4 teaspoon vanilla extract
2 tablespoons melted butter
1 tablespoon cold water, or as needed
1/2 packed cup all purpose flour, plus more if needed
1/8 teaspoon kosher salt
- bake at 400 F. for about 8 minutes, or until browned around the outside few inches

Tuesday, May 23, 2017

Frozen Vanilla Custard – Western NY for French Vanilla Ice Cream

If you’re thinking that I’ve already posted a video recipe for vanilla ice cream, I have, but for what I consider a “real” vanilla ice cream, which means no eggs. That’s called an American-style ice cream, and features a cleaner, more pronounced vanilla flavor.

The French weren’t into that. They froze their famously delicious custard, and the rest is history. While I prefer the later, I have to admit they won, since it is the style that dominates the freezer case.

I like to use pure vanilla extract over the whole bean, mostly because it’s easier, cheaper, and always consistent. Having said that, it’s hard to argue against the whole bean, so feel free to go full foodie. Speaking of which, if you don’t have an ice cream maker, there are plenty of “hacks” online that work fairly well.

I would have called this French vanilla ice cream, but where I grew up, this is called frozen custard. It’s traditionally served soft, in cones, but I prefer to freeze it firm. That way, I get French vanilla ice cream, and as it melts, I also get soft-serve frozen custard. Now that’s a win-win. Anyway, stay tuned for homemade cones, and in the meantime, I really hope you give this a try. Enjoy!


Ingredients for 1 quart of Frozen Vanilla Custard aka French Vanilla Ice Cream
5 large egg yolks
pinch of salt
2/3 cup white sugar
1 cup whole milk
2 cups heavy cream
2 1/2 teaspoons pure vanilla extract (or one split/scraped whole vanilla bean)

Friday, May 19, 2017

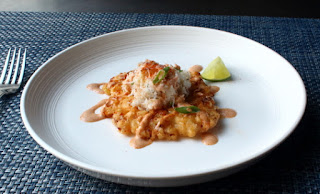
Crispy Fresh Corn Fritters with Crab and Chipotle Lime Dressing – The Other Popcorn

Everyone loves fresh, sweet corn, but there comes a time every summer when you get tired of gnawing it off the cob, which is exactly when these crispy fritters should be made. Sure, you may get splattered with a little hot oil, but I promise, it will be worth it.

Freshly shucked corn is the star of the show here, and we’re going to pack a seemingly impossible amount into our batter. Beyond the amazing taste and texture, I think you’ll be shocked by how a batter this thin, light, and crispy, can hold together so many kernels.

If you don’t know how to remove those kernels from the cob, we welcome you to check out this video to see that very technique. Other than getting your hands on some perfect summer corn, the only other thing you’ll have to decide is how to serve this.

Crab is very nice, but so is grilled shrimp, or even a ceviche, which is how they serve it at the restaurant that inspired this fritter. Regardless of how you top them, or whether you top them, I really do hope you give this great fresh corn recipe a try soon. Enjoy!


Makes about 6 Crispy Corn Fritters:
2 ears white corn (about 1 1/2 cups of kernels)
1 large egg white
1/4 cup ice water
1/4 cup self-rising flour (or 1/4 cup all-purpose flour with 1/4 tsp baking powder and 1/8 tsp fine salt added)
1/4 cup cornstarch
1/2 teaspoon kosher salt
* If need be, add a little more water, or cornstarch/flour, to adjust the batter consistency to what you see in the video.
- Shallow fry at 350°F for about two minutes per side
-- Use a seasoned cast iron skillet, as this will stick in a regular stainless steel pan
For the sauce:
1/2 cup mayo
2 teaspoons chipotle
juice of one lime 

Wednesday, May 17, 2017

Bomba Calabrese – This Pepper Spread is the Bomb, Literally

This amazing Calabrian pepper spread is as delicious, as it is unknown. It doesn’t even have a Wikipedia page. Hey, even I have a Wikipedia page. But, despite the fact there’s not a lot of information available, I believe I got relatively close, and really love how this comes out.

As I said in the video, I like this best served simply on sliced bread, but beyond that, this is one of the most versatile condiments I know. You can toss it with pasta; add it to a sandwich; fill an omelet; top a pizza; use it like a salsa on grilled fish; spice up a potato salad; as well as create the world’s best deviled eggs. Actually, I’ve never made deviled eggs with it, but I know it’d be the best.

I was intentionally vague with the cooking times and temperatures. Basically, once the onion, eggplant, and mushroom mixture is sautéed, you add your peppers, and simply cook until everything is soft and tender, no matter how long it takes. You’ll probably stay between medium and medium high heat, but be prepared to adjust as need be. This is not something we want browning in the pan, before everything is cooked.

Another key is waiting for this to cool down completely, before you finalize the seasonings. We always want to adjust a recipe at the same temperature it’s going to be served at, since that just makes sense. Another thing that makes sense, and a lot of sense, is you giving this bomba Calabrese a try soon. Enjoy!


Ingredients to make about 4 cups Bomba Calabrese:
3/4 cup olive oil, divided
1/2 yellow onion
1 small eggplant
4-5 large button mushrooms
2 pounds hot cherry peppers (or about 1 pound after trimming)
1 pound sweet red bell peppers (or about 12 ounces after trimming)
1 teaspoon kosher salt, plus more to taste
1/2 teaspoon crushed fennel seeds
1 teaspoon dried oregano
1/4 cup white wine vinegar, or to taste

Saturday, May 13, 2017

Fresh Strawberry Tart – Now with 100% Less Tart Pan

There shouldn’t be a lot of stress involved in making this free-form strawberry tart, since once it’s topped with fresh berries, and thickly glazed, it will look like something from a Paris pastry shop. And, I did say, “look like,” not “taste like,” but that’s not our fault. They have better cream cheese.

If you have a tart pan, go ahead and use it, but going free-form is always kind of fun, and even though we’re going to handle the dough a bit more, that’s not a problem with our almost foolproof buttercrust pastry. Just be sure to build up enough around the outside before you crimp, so that your tart is deep enough to hold the filling.

I joked about this being so beautiful that nobody will care what it tastes like, but of course, that’s ridiculous. Do not attempt this unless you can find some perfectly ripe, sweet strawberries. And when you do, I really hope you give this a try soon. Enjoy!


Ingredients for 6 portions:
1/2 of our buttercrust pastry dough recipe
1 pound fresh strawberries
For the sweet cheese mixture:
8 ounces cream cheese or *fromage blanc
2 tablespoons crème fraiche
2 tablespoons white sugar
1 large egg yolk
1/4 teaspoon salt
1/4 teaspoon vanilla extract
1/2 teaspoon lemon zest, or to taste
For the glaze:
1/4 cup apricot jam (the clearer, the better), plus 2 teaspoons water, heated until brushable. Let cool a bit before applying.

*Note: my cream cheese was suspiciously thin, so your mixture will probably be thicker, and a little easier to work with.

- Bake tart shell at 375 F. for 20-25 minutes, until golden-brown, fill with cheese mixture, and finish baking for another 20 minutes, or until the pastry is browned, and the filling is set.

Friday, May 5, 2017

Savory Coconut Rice – Sugar-Free and Easy

I love coconut rice, especially as a side for spicy, grilled meats, but when I order it out, it’s usually too sweet for my tastes, and more closely resembles dessert than a side dish. So, I decided to create a more savory version at home, which I eventually did, after a few short decades of testing.

Turns out that cooking rice in water is way easier than it is in the much thicker coconut milk, and that’s just one of the issues. We also have to account for the fat being introduced, which is why I suffered through countless failed attempts, before finally nailing this formula. For me this features a great balance between stickiness and separation.

As far as the taste goes, the only sweetness here comes from the coconut milk, and some toasted coconut on top. If you want it sweeter, which apparently lots of chefs do, you can add a spoon of sugar, but that’s not what I’m into. I’m going to be serving mine with rich, fatty, often sweet-glazed meats, so I want a fairly simple, savory rice, that’s just subtly scented with coconut.

Having said that, there are lots of things you can add, like herbs, fresh vegetables, and/or sliced spring onions, so personal adaptation is very much encouraged. So, whether you wait for the grilled hoisin beef teased herein, or you already have something in mind, I really hope you give this coconut rice a try soon. Enjoy!


Ingredients for 4 servings:
1 1/2 cups jasmine or long-grain rice
1 rounded teaspoon finely grated ginger
1⁄2 teaspoon red chili flakes
1⁄4 teaspoon turmeric
1 teaspoon kosher salt
1 cup water
1 (14-ounce) can coconut milk (not coconut cream)
1 bay leaf
1/4 cup toasted coconut to garnish
- Bring to a simmer, cover, cook on low for 18 minutes. Turn off heat, leave covered 5 more minutes, then fluff and serve.

Wednesday, May 3, 2017

Proper Pesto

There are lots of recipes people claim taste better if made by hand, but there’s no easier case to prove than pesto. That the name means, “to crush,” should tell you something, and while this method does take considerably more physical effort, when you taste this you’ll forget every pestle-pounding minute.

The intensity of the flavors is beyond compare, and as if by some kind of magic, this gorgeous spread develops an addictive spiciness. You can taste each ingredient, and yet when smashed together, new and wonderful flavors are released. If you’re in the market, I recommend the marble mortar seen herein, as long as the inside has some texture to it. If it seems smooth and glassy, keep looking.

Of course, you can play around with the ratios of the five ingredients, and easily adjust this to your tastes, but no matter how they’re combined, taking the time to crush them by hand is well worth the effort. I hope you give this fresh basil pesto a try soon. Enjoy!


4 cloves garlic peeled
1/4 teaspoon kosher salt
1 large bunch basil (about 4-5 ounces)
3 tablespoons pine nuts
2 ounces Parmigiano-Reggiano, grated on microplace (about 1 1/2 cups unpacked)
1/2 cup mild extra virgin olive oil